You’ve likely found this page because you have a Windows virtual machine that has low space on the C: drive. You added more space to the VM using your hypervisor administration tool but when you log into the VM to try and extend the C: drive, you find yourself confronted with the problem below:
The EFI System partition is sitting between your C: drive and your free space meaning that the “Extend” option on the C: drive is greyed out. Well crap, now what?
I spent a lot of time Googling this but I never found a satisfactory answer. Most of what I did find involved dealing with the recovery partition being to the right of the C: drive and doing various things to remove it.
The problem is we can’t remove the EFI System partition as it’s required for Windows to boot. We somehow need to move the EFI system partition from the right side of the C: drive to the left. But how?
Below are the steps I’ve found that have worked for me. Of course, this information is provided as-is. Ensure you have complete backups of your drive before proceeding.
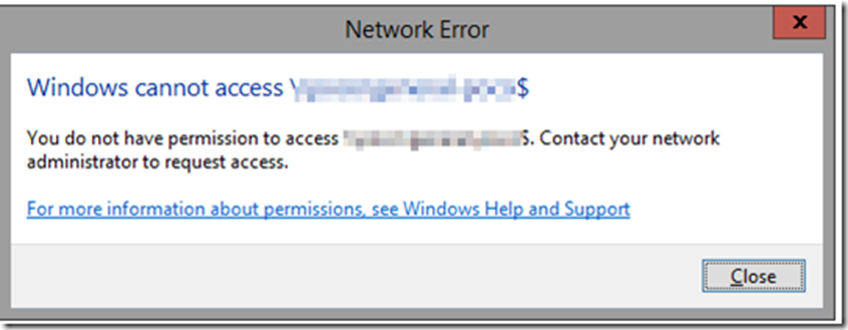
I recently had a customer express frustration they could no longer manage file permissions on their Windows Server with a newly created domain admin account. They would receive a “You do not have permission to access” error when trying to open folders in Windows Explorer when they were confirmed to have full permissions to those folders.
I’ve run into this problem before but admittedly never fully understood why. I do now though and wanted to share my learnings for the benefit of others. Here’s the scenario:
Use COMPANY\administrator account to perform NTFS file share permission changes by first RDPing directly into SERVER1, opening the folder in question using its UNC path and modify the NTFS permissions. This works as expected
COMPANY\administrator is a member of Domain Admins which in turn is a member of the local administrators group on all servers
COMPANY\administrator account is then permanently disabled and a replacement account called COMPANY\newadmin is created. This account is assigned to the Domain Admins group and thus should have permissions identical to that of COMPANY\administrator
RDP into SERVER1 as COMPANY\newadmin and try to open the same folder using the same path that previously worked as COMPANY\administrator and receive this error:
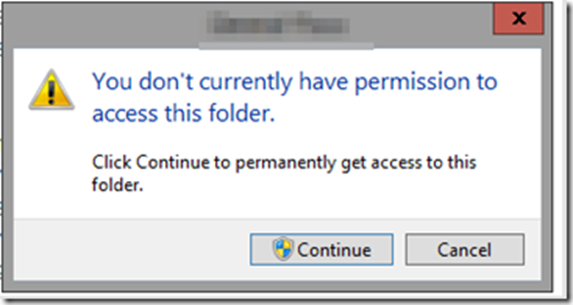
Next try to open the folder directly in Windows Explorer (rather than the UNC share) and get this message:
Pressing continue grants access to the folder but it does so by granting the logged in user “Full Control” to the ACL of every individual file and folder selected. This can take a long time and doesn’t make intuitive sense as to why it’s even necessary as COMPANY\newadmin is already a member of groups that have access to this folder
Using the “Effective Access” verification tool in Windows confirms the permissions granted to COMPANY\newadmin on the folders tells us that it’s supposed to have “full control” and yet that is not the behavior we see
As you might guess, the root cause is ultimately User Account Control or UAC but it’s a little more nuanced than I would have expected. UAC removes the admin tokens from the non-elevated session of COMPANY\newadmin at login which means when Explorer.exe is started, it runs in a non-elevated session.
This ends up being a problem as documented by Microsoft here:
“This behavior is by design. But because the typical pattern with UAC elevation is to run an instance of the elevated program with administrative rights, users may expect that by selecting Continue, which will generate an elevated instance of Windows Explorer, and not make permanent changes to file system permissions. However, this expectation isn’t possible, as Windows Explorer’s design doesn’t support the running of multiple process instances in different security contexts in an interactive user session.”
That’s the issue. Explorer is running non-elevated and because of the long history of Windows Explorer and because its codebase long predates User Account Control as a concept, it doesn’t support being able to switch from a standard to an elevated session. Microsoft created the workaround we are familiar with whereby explorer launches a different process that then updates the ACLs of each individual file but that’s a kludgy workaround at best.
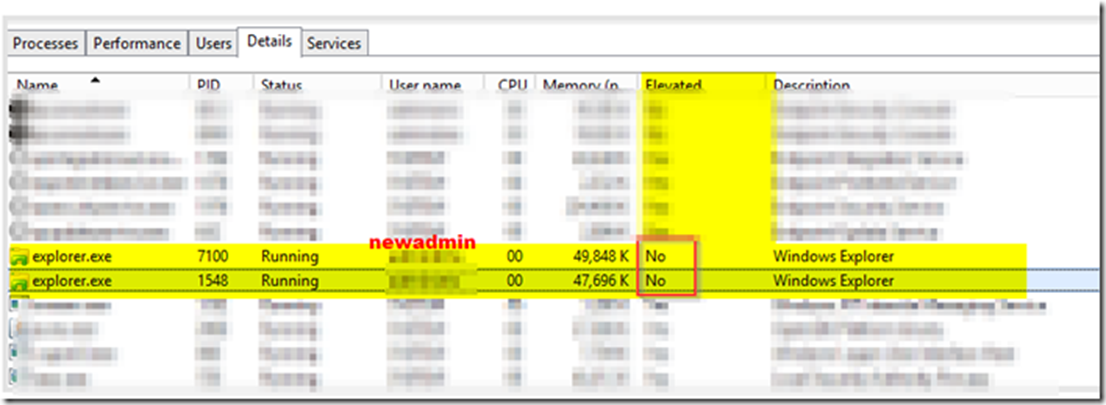
This behavior can be confirmed by accessing the same folder using any other tool such as PowerShell. In the example below I’m logged in as COMPANY\newadmin and am trying to open a folder. On the left I try to do so through Windows Explorer and I’m denied. On the right in the exact same session I do so in an elevated PowerShell session and it works fine:
If we check Task Manager, we can see that explorer.exe is in fact running without elevated rights by design when UAC is enabled. Due to how explorer.exe is architected, a second elevated instance cannot be started in the same user session:
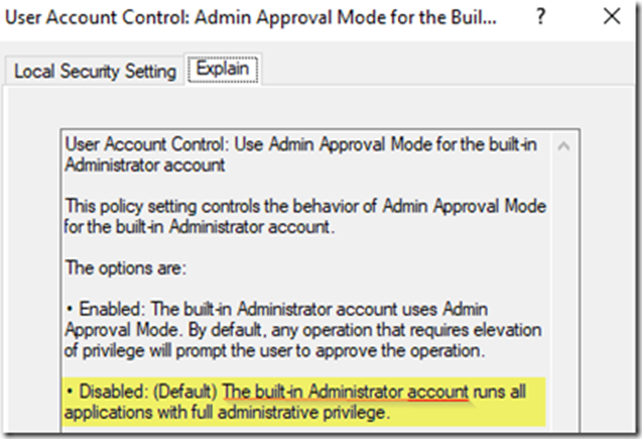
This is great but still leaves an unanswered question. Why was the customer able to modify these exact same permissions with the COMPANY\administator account on the same server? I would think that account should be subject to the same security but clearly wasn’t. I speculated that a previous administrator in years past may have created some kind of exception for the account. It took some digging but I believe I found that setting:
Under Computer Configuration –> Windows Settings –> Security Settings –> Local Policies –> Security Options:
You can see above that “User Account Control Admin Approval Mode for the Built-In Administrator” account is set to disabled which always runs everything, including explorer as elevated.
Now that we understand that UAC is causing this issue, how can we workaround it?
Microsoft recommends the best practice of encouraging administrators to perform all of their server administration remotely as opposed to logging directly into individual servers directly via RDP. I think this is why this issue has never been fully addressed as if administrators followed this best practice, they would never encounter this issue. This means that even though you get an access denied issue when accessing the shares locally on the server, file access works fine when accessed remotely through UNC.
This brings us to the workaround which is remarkably simple:
Connect to SERVER1 remotely from a different server using the COMPANY\newadmin credentials and browse to the desired file share
Modify your permissions from there as desired. You will no longer receive the security prompts as described above
A thought popped in my head this evening I couldn’t shake. What would a music critic from the first year the Billboard Hot 100 launched think of the progression of pop music since? We live in the age where all the information you could want is at your finger tips so I decided to try and find out. Here’s what I did:
I went to Billboard’s website and got a list the #1 song from each year since its founding in 1958
I loaded up Audacity and configured it to capture audio from my computer
I searched Youtube for every single song on the list in chronological order and played a random short sample from each song, recording directly to an MP3
I saved that file, uploaded it here and is now available for your listening enjoyment (62 years of music in 16 minutes)
If you’re going to consume this silly experiment the way it was intended, I recommend putting on a pair of headphones, closing your eyes and pretending you are a music critic from the late 1950s. You’ve been told you will hear #1 hits from the future and you must attempt to find the throughline of themes and melodies for the next 60 years of music. Listening to this all at once proved to be an enlightening experience as the individual threads that make up the progress of modern pop music became ever more visible.
A few notes of trivia:
From 1958 to 2020 only one artist has has a #1 hit more than once. Can you guess who? Yep. The Beatles
Elton John gets an honorable mention though as he had a second bonus number one in 1997 for his tribute to Princess Diana
A few of the song clips go a little longer than others. That wasn’t intentional but rather I realized I was vibing to the music. I opted to leave those slightly longer clips in
Clips from every billboard hot 100 #1 from 1958 to 2020
I was recently tasked with determining why a NAV 2018 installation was occasionally performing poorly. I suspected that one or more users were running particular queries or functions but I needed to find a way to prove that. The catch was I am not a SQL DBA and I know even less about NAV. But that’s how it is sometimes. It falls on you when no one else can figure it out.
I did a lot of Googling but the consensus seems to be that it’s not possible to find the specific NAV user running any given SQL query because from the perspective of SQL every query is run as the NAV service account. I found posts that explain how to enable SQL/NAV debugging to try and capture the user name in real time but this puts a lot of extra load on an already poorly performing system and we didn’t know exactly when the issue would occur.
I decided to build a NAV 2018 lab environment with multiple users to see if I can find a way to determine which user was running which queries. I came up with something that seems to work and wanted to share it in case it benefits others.
In the screenshot below, I have 2 users called ADMIN-RV and JSMITH. I used the NAV Client to perform various NAV functions with each user. The report below shows how long each query took to execute, the full SQL query (not limited to just 4,000 characters) and most importantly of all, the actual NAV user account that executed the query. The rows that do not include a username are internal system queries and are not associated with any end user. The report below shows all queries for testing but in production we would limit it to queries that ran for longer durations.
This HOWTO explains how to configure a completely fresh environment with Dynamics NAV 2018 and the Contact Insight Dynamics NAV Outlook Addin on-premises while using Azure AD for authentication.
The reason this HOWTO was created is a customer wanted to use the Contact Insights NAV plugin for Outlook. It was determined that this plugin does not support the default “Windows” based authentication NAV uses by default and instead must use either “NavUserPassword” authentication or AzureAD authentication. The latter provides a more single sign on experience and since the customer already uses Office 365, it was decided to implement the addin using AzureAD.
Unfortunately the documentation Microsoft provides is lacking in the implementation details and so there has been considerable banging my head against the wall. Now that I’ve gotten it working, I wanted to document my steps for the benefit of both others and for future me.
This HOWTO is partially based on the official Microsoft guides for configuring AzureAD and the Outlook addin and are available here:
In order to proceed, you will need the NAV 2018 installation media. That can be downloaded at the link below and at the time of this writing the newest version available is Cumulative Update 20.
Note: This free download can be used to install the full application and includes a demo license and database that will be sufficient for testing
Here is what our lab environment looks like. For your purposes, please replace any reference to company to the name of your Office 365 tenant or domain name as appropriate
UPDATE: Since I made the waypoints anyway, I thought it might be fun to make a video flythrough of the entire 21.1KM of the course. It’s quick and dirty and more than a little silly but it does serve to demonstrate that this is not going to be easy. Check out the video here:
I’m as surprised as anyone but I have officially registered and paid to run a 21.1km half marathon this October. Specifically I have entered the 2019 Okanagan Half Marathon which takes place in Kelowna, BC on October 20th. For those keeping score at home, that’s just 6 months from the time of this writing.
I wanted to know what the route looked like so I could better visualize and mentally prepare during my training. Unfortunately while the official website (available at https://www.okanaganmarathon.ca/route-maps-p183040) includes a “Route Map” for the “21K”, it actually only includes written directions. That’s not terribly useful.
So I decided to manually map out all of the waypoints of the course in Google Earth Pro. I figure I’d post this here in case it’s useful for anyone also participating in the same race or more generally are interested in what 21KM actually looks.
To start us off, here is what the course looks like when taken in as a whole. The segments highlighted in yellow are those that have to be completed twice (once in either direction).
I heard tonight that a local radio station will celebrate International Women’s Day by playing songs exclusively by women for 24 straight hours. This got me thinking — could I fill an entire day’s worth of music sung only by women and do so using only songs that I actually know and like?
I realized I have almost 1,000 songs in my MP3 collection that have been acquired over two decades. I figure if I have it, it’s a safe bet to say I like the song so I wondered how many hours all those songs would add up to.
First I needed to set a couple of ground rules. Since the objective is to fill “24 hours” of Radio airplay, I have to take into account commercials and DJ banter. Some googling suggests that a typical radio station plays 80% music every hour which sounds about right. That works out to 40 minutes each hour or 16 total hours of music over a 24 hour period.
Finally, to be eligible for this list, the song must be sung exclusively by a woman or women. Duets or guest spots make the song ineligible.
To figure this out, I needed to scan all of my MP3s and dump the list into Excel along with each song Duration.
Where the ##-### is the specific exam you are writing. You likely also know that the way Microsoft presents this information is not ideal from a study guide perspective. It’s broken into categories and from there is just a jumble of words including many, many “filler” words like “plan and configure” or “configure and troubleshoot”.
I am writing a new certification exam and I wanted a simple means to know what specific concepts to study and play with in my lab. I realized that I should be able to write a PowerShell script that would download the HTML from the URL above, extract the exam syllabus text and then cut out all of the unnecessary words. This would leave me with a clean “checklist” of keywords I need to Google and understand.
I recently had my furnace fail while I was away on business. Fortunately there were no lasting consequences but it could have been a very bad day. To try and minimize the risk of such issues in the future, I decided I wanted a temperature monitoring solution that would alert me if the temperature in the house dropped below a pre-defined threshold. I looked at things like a Nest and the TempStick among others but all of them were hundreds of dollars and or relied on third party cloud services. Before I invested in something like that, I wanted to see if I could build my own solution for cheaper and that was designed to meet my exact needs. I recently received a Raspberry Pi from a friend and decided this would be a great use for such a project.
Specifically I set out to have the following goals:
The Raspberry Pi would record the temperature from a dedicated external temperature sensor every 20 minutes and record that value into a SQL database along with the timestamp
The Raspberry Pi would host a webserver that would allow me to review the current and historical temperatures from anywhere using my mobile phone
The webpage would also include a generated graphical chart showing the historical temperatures so I can review for any odd behavior at a glance
The Raspberry PI would automatically email me if the temperature dropped below a defined threshold so I could make phone calls to take immediate action
The Raspberry PI would upload a file to my off-site website host during each scanning interval via FTP
A cron job would run on my off-site webhost that would look for that file and if that file was not updated for more than one hour would alert me that either a power or Internet failure occurred at my house
I’m happy to report I achieved all of the goals above and figured I’d should share how I did it below. Keep in mind I am not a software developer and so this solution is the result of grabbing things from the Internet and cobbling them together and tweaking until it does what I want. With that out of the way, let’s begin with what you need to create something like this for yourself.
Update: 4/11/2022: An individual by the name of Adam Cook has taken the premise of this script and transformed it into a far more robust PowerShell module and published it on Github. I wanted to ensure I gave his project all the visibility I could. The Github page is available here:
Have you ever needed to calculate how many business hours / working hours have elapsed between a specific date and now? For example, you may have some metric that says something needs to happen within 4 business hours. We define business hours in this case as 8AM to 5PM Monday to Friday and does not include statutory holidays. How might you go about doing that?
I found myself in this situation and figured it would be common and spent far too much time Googling trying to find someone else who built a solution for this problem. To my surprise, I was unable to find a single working example for PowerShell. Lots of examples for other languages such as T-SQL but nothing for PowerShell. I was therefore forced to solve this myself.
Hopefully this will help you if you ever find yourself in a similar situation.
Before we get into the code, I’d like to start with a quick demo. In my situation, we have a ticketing system and we want to kick off a process any time a ticket remains untouched for more than 4 business hours so we need to determine how many business hours have elapsed since the last touchpoint on the ticket.
In our example, the last time the ticket was interacted with was on December 21st, 2018 at 14:43:11. The current date in this example is Friday January 4th, 2019 at 13:41:56.
As we see in the screenshot below, after the ticket was last touched, 2 hours 16 minutes and 49 seconds elapsed until the end of that business day. Since this was a Friday the next 2 days were Saturday and Sunday and so we don’t add up these times. The next week is actually the Christmas break so we also don’t want to count any of these.
The first official day back is Wednesday January 2nd, 2019. Since the current time is newer than this we can simply add in a full 8 hours. We do the same for the 3rd. Finally on the 4th, since the current time is 1:41PM, that means we have already elapsed an additional 5 hours 41 minutes since 8AM.