HOWTO: Force (really) WSUS Clients to Check in on Demand

You're most likely here because you are an IT administrator and you have a network that deploys Windows Updates via Windows Server Update Services or WSUS.  Perhaps you're relatively new to WSUS or you're a veteran that has been using the product since its inception.  In either case, you are mostly frustrated because even in the latest release of WSUS that there is no reliable way to force clients to check in and report their status.  You know about wuauclt /reportnow and /detectnow.  You may even be aware of the .NET method  (New-Object -ComObject Microsoft.Update.AutoUpdate).DetectNow().

But despite having tried everything, you're at at a loss.  All you want is for your clients to report their current status into WSUS on demand.  Is that really too much to ask?  Actually, it might be.  If you google "force wsus client to check in to wsus server", you'll see almost 300,000 results.  And I swear I've read every single one of them and tried every single suggestion.  

I finally decided to take matters into my own hands. I built a lab environment consisting of a domain controller, a WSUS server and a client machine.  I then proceeded to deep dive with process monitor and packet analyzers to try and find a way to "trick" the WSUS client into thinking it's time to report in.  After many hours at this, I was just about to give up when I accidentally stumbled upon the magic command I was looking for.

Continue reading

HOWTO: Backup and View All Contents of an Android Device

This HOWTO is written primarily for my own future reference but hopefully it’ll help someone else too.

Let’s say you want to back up the entire contents of your Android device.  How do you do that?

1) Download the Android Debug Bridge (ADB) tool that comes with the Android SDK Platform Tools.  The link of which is available here: https://developer.android.com/studio/releases/platform-tools.html

2) You should end up with the ADB tool in the following location: c:\adb\adb.exe

3) On your mobile phone, go to Options / Developer Options / and enable USB Debugging

4) Connect your phone to your computer via a USB cable

5) Open a command prompt and type c:\adb\adb.exe backup -apk -shared -all -f c:/adb/backup.ab

6) On your phone, you’ll receive a prompt.  Enter your password and choose “Backup my Data”  You will be prompted to enter the decryption password.  Remember this password as you’ll need it to view the contents of the backup

7) Wait for this process to finish.  It will take a while depending on how much data you have on your device

Continue reading

HOWTO: Generate a Microsoft Exam Checklist

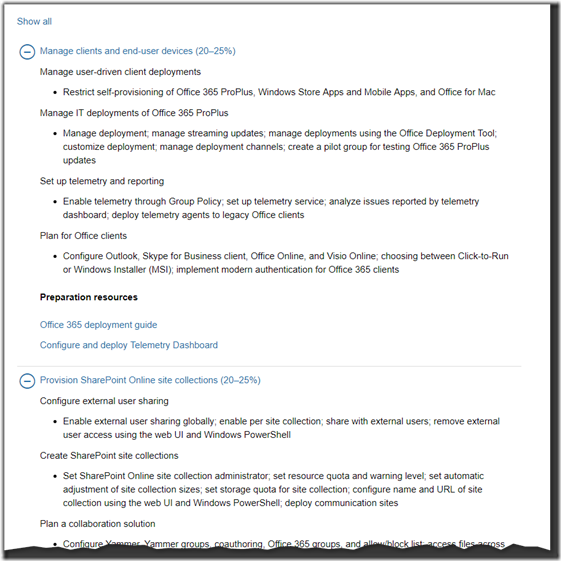
Are you studying for a Microsoft certification exam?  If so, then you are probably familiar with the “Skills Measured” website that describes what will be covered on your exam.  If not, it looks something like this:

70-347_raw

I’m currently studying for my 70-347 – Enabling Office 365 Services exam.  The skills measured list above is a great starting point to use to determine what to search for and study and experiment with in your lab.  However the layout of the website has never appealed to me.  I would much prefer the text in Excel where I can annotate and color code it.  Unfortunately you can’t just copy and paste the text from the website into Excel as the HTML formatting makes everything a mess.

Continue reading

Is it just inflation?

I recently received a reminder to renew my AMA Plus membership.  2018 marks my 10th anniversary of having an AMA membership.  I pay in annual lump sum payments as it’s cheaper than the monthly option.  I was curious how much they’ve charged for the service over the last decade.  Have a look as I think it’s kind of interesting.  Here’s what I see:

  • In 2008, they charged me about $123 for the year for my initial sign up.  At this point since it’s a new service and we don’t have a baseline, we’ll use this as are reference frame
  • The following year, which is presumably the most likely period one would choose not to renew if they didn’t use the service, AMA greatly discounted the service making it far more likely that if someone was on the fence they would renew “just because”
  • You’ll note that from year 3 to year 9 the price increases at a nearly perfectly linear rate.  The jumps aren’t massive but if we look at the different of the 2009 payment compared to the 2016 payment we see it increased by a non-trivial 16%
  • Then, oddly, right before the end of the 10 year duration which is the next psychological marker, the price drops again.  Coincidence?
  • If you still renewed, then they know that they’ve got you and you won’t easily leave so what do they do, they increase the price by a larger amount than any previous period

image

All and all, the delta from the cheapest period to the most expensive is nearly 20%.  Recall that during this period, the membership plan remained constant with no changes and only one call was ever made to AMA in 2017, which coincidently is where the drop occurs.  The data suggests I should call in for service calls more often to get a greater discount on my renewals.  Therein of course lies the danger of drawing conclusions from this kind of data.

Now what happens if we compare this to inflation?  According to inflationcalculator.ca, a product that cost $123 in 2008 would cost $140.50 in 2018.  AMA is actually slightly under that.  It would seem the price increases really are just to cover inflation.

image

I found it interesting and figured I’d share.

HOWTO: Automate One-A-Day Photography

This will be a somewhat unusual HOWTO compared to those typically on this site.  In an effort to lose weight, I decided I wanted to take a photo of myself, once per day so I could track and further motivate the progress of regular exercise.  I then wanted to overlay the date each photo was taken as well as my weight on that day.  Finally, I wanted animate these daily photos into a GIF and upload it to my website so I can remind myself anywhere of my objective of losing weight.  The trick is I wanted to automate this entire process.  This meant I needed to find a solution for the following:

  1. Remotely control my camera to be able to take a picture and download it from an automated script
  2. Be able to programmatically crop the image from the camera to remove everything except the white background and myself
  3. Have a mechanism to be able to overlay text onto an existing image so I can add the current date any my weight data
  4. Obtain my latest weight from my Garmin Index scale via Garmin Connect and append it to the image
  5. Combine all of the previous images into an animated gif so I can watch my progress
  6. Automatically upload the animated gif to my website so I can view it anywhere

To complete this project, I decided to try and leverage my Canon S100 which I purchased as Canon’s top-end prosumer camera in 2012.  As I researched my options however, I discovered that Canon disabled any kind of remote control capabilities for this camera.  Fortunately I discovered that some very smart people created an alternative firmware for many popular Canon cameras including mine.  This firmware is called the CHDK or “Canon Hackers Developer Kit”.  This provides all sorts of additional features that are otherwise only available in Canon’s DSLR professional series cameras.  The one that I’m most interested in however is that the firmware provided the option to remote control my Canon S100.

Continue reading

Bank of Canada Interest Rate Changes Review

For those of you that live in Canada, you are no doubt aware that the Bank of Canada recently increased their policy rate from 0.5% to 0.75%.  I heard of a lot of media reporting that said this is the first change in 7 years.  I further read that we could expect further increases in the near future.  Since this policy rate directly impacts the rates that regular consumers get on any new loans and impacts even existing with variable rates, it seemed important to understand how this rate has fluctuated over the years.

To that end I did some research and found that on the official Bank of Canada website, you can download a CSV containing a list of every single day for the last 10 years and what the interest rate was on each of those days.  That is available here:

http://www.bankofcanada.ca/rates/interest-rates/canadian-interest-rates/

I wanted to know what the shortest number of days has been between interest rate changes.  Given the large scale impacts of changes to this rate in the country I assumed it would be something that was done exceptionally cautiously and once changed, a long waiting period would take place to review the impact.  According to my research though this assumption doesn’t appear to hold true over the last decade.

First though, a comment on the news reports that this is the “first change in 7 years”.  That claim turns out to be patently false.  The recent change represents the first increase in 7 years.  Over that time frame however we’ve seen 2 decreases to the rate.  Below are my findings:

Continue reading

HOWTO: PowerShell Function Return Quirk

Have you ever been using PowerShell, created a function that called another function and then tried to return data from the parent function only to discover that the returned data included more ‘stuff’ than you intended? This quick blog post demonstrates why that is and presents one workaround to prevent it in the future.

Clear-Host

Function Show-OutputMessage
{
    # Note that the only thing this function does is write to the pipeline.  It does NOT return any data.
    Write-output "An important message"
}

Function Run-Function
{
    # Inside a function, we call a sub function that inside that calls write-output. 
    Show-OutputMessage

    # Let's assume this parent function performs some kind of operation that returns a status code.  So the only thing we want to return is the status, ie:
    return "OK"
}

$Status = Run-Function
if($Status -ne "OK") { write-host "It's broken" -ForegroundColor Red } else { write-host "It's working” -ForegroundColor Green }

Consider the code above.  Pay attention to the Run-Function.  Let’s say this function performs some operation and then returns a status code upon completion.  In this example, it is returning “OK”.

You would then expect that the code at the end of the script that captures this return code and then performs and if operation on the result would return “It’s working” since it returned OK.  But it doesn’t.  If we run this code, you know what we get?

image

Why is that?

It turns out that unlike other programming languages, PowerShell returns everything that happens inside a function regardless if you use the return function or not.  So in the example above, we used Write-Output to write a message to the pipeline.  This was then returned along with the “OK” from the parent function resulting in an array of:

[0] “An important Message”

[1] “OK”

This is why the if ($Status –ne “OK”) doesn’t work since it’s trying to compare an object to a string.

So what’s the fix?  You need to ensure that the ONLY thing your function returns is the data that you want.  In this case, we don’t want Show-OutputMessage to be returned so we have to send its output to Null as in:

$null = Show-OutputMessage

Now the only data being returned is your “OK” status so the if statement works as expected.

image

The moral of the story is be very careful with what you add to the pipeline while in a function if you care about the return value since it likely isn’t going to be what you expect it to be.

HOWTO: Use Autohotkey to Toggle Windows Based on Window ID

Autohotkey is an invaluable tool for automating tasks we perform hundreds of times per day without even thinking of it.  The tasks many only take a few seconds each, but added up over the course of a year or more, it really adds up!  One such common task involves switching between applications in Windows.  Sure, you can click the application you want on the task bar or use Alt-Tab. But what happens when you have a ton of programs and tabs open?


You have to hunt.


Wouldn’t it be great if you could just press a keyboard shortcut to launch/resume any application?  This is where Autohotkey excels.  You can configure it for example to toggle between applications based on their window title.  But what if you can’t use the window title?  This post shows you how to toggle between an application where the title constantly changes and you otherwise have nothing consistent about the application with which to configure Autohotkey to use.

Continue reading

HOWTO: Run Process Monitor on a Remote Machine from the Command Line

I have a treat for you today.  I have finally solved something that has been a pain in my side for years now.  Have you ever been in the following situation?

You are reviewing log files and discover that a remote computer (perhaps a virtual machine running on shared storage) is running wild and hammering on the disk.  You need to figure out what exactly what processes and files are causing that disk IO.  However perhaps that computer is always in use and you simply can’t log in locally to launch resource monitor or process monitor.  You need ultimately to run Process Monitor remotely.  Unfortunately you google this and discover that it’s not possible due to the amount of data that process monitor generates and can’t pass it all over the wire.  So what do you do?

I found myself in this exact situation yet again today and finally decided to sit down and solve it once and for all.  My googling revealed a suggestion in some forum to use psexec to run procmon.exe on the remote machine and then copy over the PML file to your machine for analysis.  I’m afraid I couldn’t find that blog post so I can’t give credit to the original author of the idea.  But there is a world of difference between an idea and a practical implementation and that’s what I have to share with you today.

Below is a PowerShell script that includes a function called Get-ProcMonData.  It accepts just two parameters, a -ComputerName for the name of the remote computer you wish to connect to and -Duration for how long procmon will run for on the remote system.  Note that the script is hardcoded to limit you to a maximum of 100 seconds as I discovered the hard way that Procmon generates an enormous amount of data and you can easily fill the remote drive if you’re not careful.

Continue reading

HOWTO: Add Computer to Group without Restart

Credit where credit is due, this is taken directory from the blog below and is documented here only so I can easily find it again in the future.

Source: https://deployhappiness.com/quick-tip-add-computer-to-group-gpupdate-without-restart

Let’s say you add a computer to a group but you want that computer to gain that membership but can’t restart the system.  What do you do?

From an administrator command prompt type: klist –li 0x3e7 purge followed by gpupdate /force

image

This will clear the Kerberos ticket and request a new one which will force new group enumeration.

A handy trick to be sure!