
You’ve likely found this page because you have a Windows virtual machine that has low space on the C: drive. You added more space to the VM using your hypervisor administration tool but when you log into the VM to try and extend the C: drive, you find yourself confronted with the problem below:

The EFI System partition is sitting between your C: drive and your free space meaning that the “Extend” option on the C: drive is greyed out. Well crap, now what?
I spent a lot of time Googling this but I never found a satisfactory answer. Most of what I did find involved dealing with the recovery partition being to the right of the C: drive and doing various things to remove it.
The problem is we can’t remove the EFI System partition as it’s required for Windows to boot. We somehow need to move the EFI system partition from the right side of the C: drive to the left. But how?
Below are the steps I’ve found that have worked for me. Of course, this information is provided as-is. Ensure you have complete backups of your drive before proceeding.
At a high level the solution is not to ‘move’ the EFI partition but rather to delete it entirely and then rebuild it on a new partition created from extra space from the recovery partition. We do this with a combination of a third party open source partitioning tool and a Windows command to rebuild the partition. Here’s how it works:
Additional Considerations (As noted by commenter Siegfried):
- The solution described here will steal space from the recovery partition reducing the total size of the recovery partition. This could potentially cause issues in the future in a Windows Update for example if Windows tries to perform an update on the recovery partition and insufficient space is available.
- This solution may not properly assign a GUID to the EFI partition that could result in unexpected issues. A better alternative may be to create the free space from the recovery partition in Gparted but then create the partition itself using the Windows command “create partition efi size=100” This has not yet been tested by me as the solution described seemed to work from me but is provided here for additional context.
- Download GParted from here: https://downloads.sourceforge.net/gparted/gparted-live-1.5.0-1-amd64.iso
- Boot the ISO in your VM. If it doesn’t boot, ensure Secure Boot is disabled in the VM and that the firmware is set to boot the DVD drive first. Press enter on all defaults until the gparted GUI application as launched
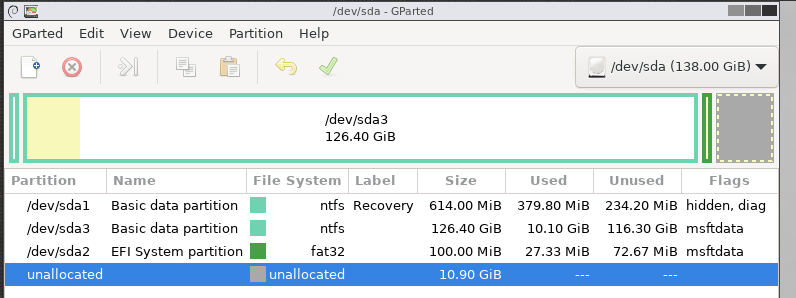
- Your screen should look like the one below with the first partition being the recovery partition, the second being your C: Drive, the 3rd being the EFI System Partition that’s preventing you from resizing your C: drive and finally the unallocated space we want to add to the C: drive
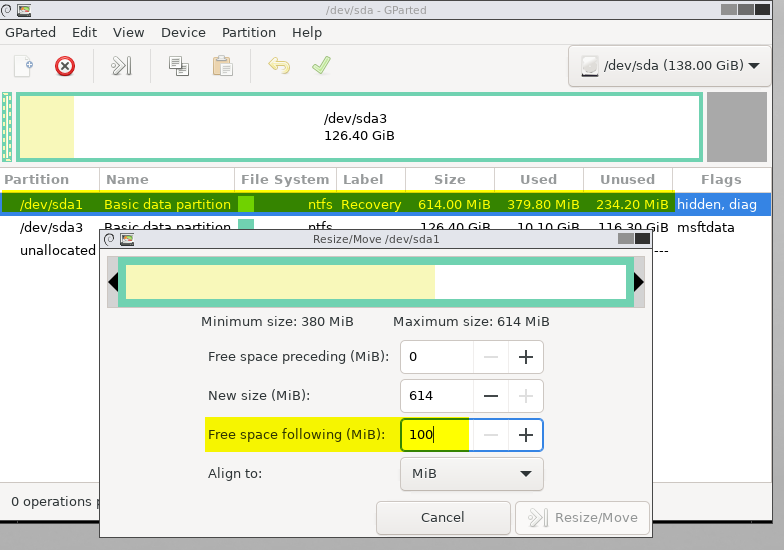
- Select the fat32 ~100MB EFI System partition and choose Delete and then Apply all Operations checkbox at the top
- Select the Recovery partition, right click and choose Resize/Move and add 100 to Free Space following (MiB) and press Resize/Move (if the button is greyed out, press tab to switch focus which should light up the button
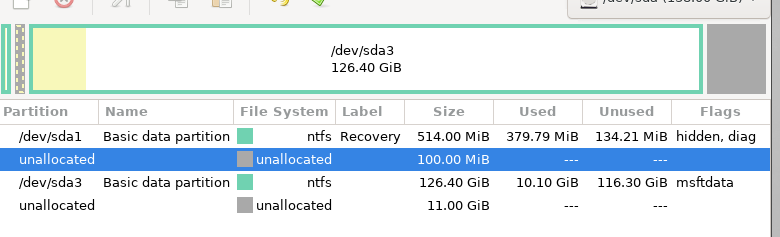
- Your view should now look like this with a 100MB unallocated partition BEFORE the main C: drive data partition
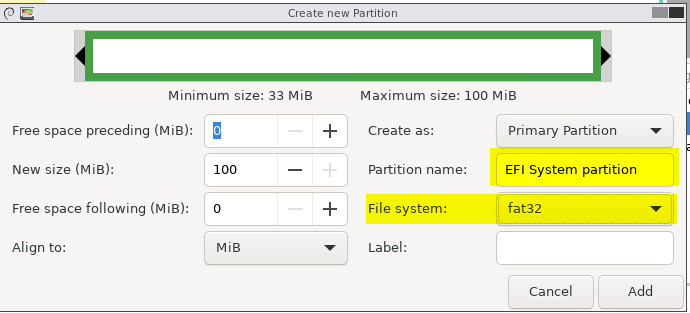
- Right click on the 100MB unallocated partition and choose New. Set the partition name to EFI System partition and the filesystem to fat32 and press Add
- Press the Apply changes button and close gparted
- The system will not boot at this time. Insert the Windows installation media ISO. In my example I’m using a Windows Server 2019 ISO
- When you get to the Windows Setup main page press Shift-F10 to bring up a command prompt
- Type diskpart
- Type select disk 0
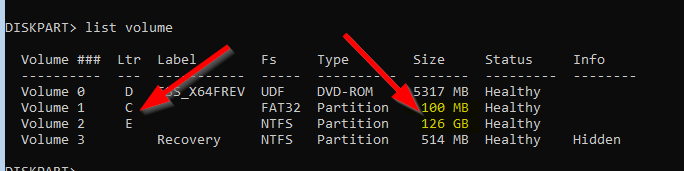
- Type list volume
- Make note of the the drive letters assigned to your 100MB EFI partition and your large C: drive. If no drive letter is assigned type select volume # (where # is the 100MB EFI Volume) followed by assign letter = s to mount it as the S: drive
Type exit
Rebuild the EFI System partition by typing the command bcdboot c:\windows /s [drive letter of your system partition] (in the example above that is mounted as “C:”)
For example, in the example screenshot above the command would be bcdboot e:\windows /s c:. You should see the output below

Important: In the example above the C: drive is the EFI partition and the E: drive in the data partition. I realize now how confusing that is.
Type exit and reboot your computer and try to boot normally.
You should find your EFI System partition is indeed now to the left of your C: drive and you can extend your C: drive as desired:


3 comments
Though this may work, I have a few concerns there.
1) You do not actually create an ESP partition. You create a fat32 formatted partition that you name ‘EFI system partition’. To end up with an ESP partition, it needs to be created with a specific GUID. In diskpart you would use ‘create partition efi size=100’. In GParted, I assume, you would create the fat32 partition, then right click, select manage flags, then select esp.
2) You reduced the size of the recovery partition. This means you could run into problems later if a future Windows update tries to update the recovery image. It would be better (although more time consuming), if you moved the NTFS partition to the right (into the free space) by 100 MiB and then created the new ESP in the free space after the recovery partition.
Author
Thanks for the detailed response Siegfried. To address your comments specifically:
1) I did run into the partition GUID in my reading as well as the Boot/ESP flags in Gparted. I had them set in earlier tests but then found that it seemed to work fine without them. I assumed (likely incorrectly) that the bcdboot command was modifying the partition to match whatever requirements Windows had since that command allowed Windows to boot in my test environment when none of the other many other permutations I tried did. I’ll test in my lab again and update the documentation to add the flags in gparted since that seems like the easiest way to make the partition since you’re already in gparted anyway at that point.
2) The issue I have here is in the production environment that prompted this HOWTO, the C: drive is over 1TB and resizing that is going to take a long while. The reality is we have both SAN snapshots and offsite backups for the VM so at least in our case we have been removing the Recovery partition entirely in situations where it has gotten in the way as we’d use other methods to recover first. But you raise a very good point. I’ll update the body of the text to note this for any future readers.
Thanks again.
Worked like a charm! Thank you for this post!