HOWTO: Clean up vRanger savepoints with Powershell

The scripts below I came up with as a way of identifying old or orphaned savepoints within vRanger 6.1.  Be careful with the remove command though as in its current form will also delete any differentials.  That’s probably what you’re looking for but if you have weird orphans, it might cause you some issues.  Pay close attention to what the reporting script says it’s going to delete.

#DELETE ALL VRANGER SAVE POINTS OLDER THAN 10 DAYS

# FIRST YOU NEED TO GET THE REPOSITORY ID FOR EACH REPOSITORY YOU WANT TO CHECK
Get-Repository | ft name, id

# TO SEE WHAT YOU'RE GOING TO DELETE, RUN THE FOLLOWING
get-repository -id [repositoryidfoundabove] | Get-RepositorySavepoint | Where-Object {$_.StartTime -le [datetime]::Today.AddDays(-10)} | select VMPath, EndTime, SizeInmbStored, SpaceSavingTechTypeID | convertto-csv -NoTypeInformation | clip.exe

# THE SCRIPT BELOW WILL REMOVE ALL SAVEPOINTS OLD THAN 10 DAYS 
# *IMPORTANT* THIS WILL DELETE BOTH FULL AND DIFFERENTIAL SAVEPOINTS
$savepoints = get-repository -id [repositoryidfoundabove] | Get-RepositorySavepoint | Where-Object {$_.StartTime -le [datetime]::Today.AddDays(-10)
foreach ($savepoint in $savepoints){
remove-savepoint -SavePointsToRemove $savepoint
}


HOWTO: Configure Citrix Netscaler to Perform Website Aware Load Balancing

This HOWTO describes the process of configuring a Citrix Netscaler to monitor for a keyword on a load balanced website and if that key word is not found (ie the node has failed), remove it.  Once removed, continue scanning and once the node is back up, read it.

  • The foundational technology we use here is called a “Monitor” which in Citrix parlance is a entity that can be used to repeatedly check some condition against some service
  • While you can configure monitors from the GUI, it turns out the GUI adds some random carriage returns that breaks the entire process so you have to do it from the CLI
  • So first you want to putty into the Netscaler.  Once logged in, you can type “shell” to access the full linux command line.  In our case, we don’t want to do that as we are running Netscaler specific commands
  • Create a new monitor using the command:


add lb monitor [monitorname] TCP-ECV -send “GET / HTTP/1.1\r\nHost:[hostheadername]\r\nConnection:Close\r\n\r\n” -recv [Keywordtosearchfor] -LRTM ENABLED

  • What this command does is:
    • creates a monitor called monitorname and makes it based on the built in template “TCP-ECV”.  The arguments provided to the –send parameter tell it what to send to the IP address you’ll configure later.  (You can probably configure it on the same line but I don’t know how to do that yet).
    • The GET / says get the root page.  So in this case, hostheadername doesn’t have an index.html or anything on the end so we can simply request the root page.
    • Because we are using host headers, we have to provide the host we are looking to connect to.  (This was the hardest part to figure out).  You’ll note the line remarks for \r and \n.  Those are critical as they must follow the HTTP standard.
    • The “connection close” close the connection after you obtained the information you needed so you don’t leave it hanging open.
    • Keywordtosearchfor is the string we’re looking for in the results to determine if the page is serving the content you expect or not.
    • The LRTM stands for “Least Response Time using Monitoring”.  I don’t know what it does but it seems like I need it.

    Continue reading

HOWTO: Resolve “login failure” issue for Service Account after Restart

Hi,


Have you ever had a situation where you have a service account configured on a Windows box and everything works great… until you reboot the server? After the reboot though, the service doesn’t start. When you open the services MMC, you discover that the status is in fact shown as not started.

So you right click and try to start it. But that doesn’t work. You get a “service did not start due to login failure error.” That’s odd.

So you open the properties of the service, retype in the password and voila! It works…

… until you reboot again at which point you repeat the entire process over again. What’s going on here?

It turns out that if you defined any settings “Log on as a service” right in a GPO (most likely the Default Domain Policy), that policy will trump any local server settings (just as GPOs are supposed to).

So to ensure that the server will “remember” the password across reboots, you need to do the following:

  • On a domain controller, open the Group Policy Management Console
  • Open the policy where you configured the “login and as service” right (again, most commonly this is done in the Default Domain Policy)
  • Browse the tree to Computer Configuration -> Windows Settings -> Security Settings -> Local Policies/User Rights Assignment -> Log on as a service
  • Edit the Log on as a service setting


  • If you are experiencing the problem described in this HOWTO, the “Define these policy settings” will be enabled and you will have domain accounts specified in the list. These are the ONLY accounts that are allowed to login as a service in your domain. You should further find that the domain account specified in the service in question is not listed here. You’ll need to add it.
  • Once you’ve done this, refresh your group policy on the server in question. You can run rsop.msc (Resultant Set of Policy) on the server to validate that the new account is present
  • That should be it. Now when you reboot the server, the service will start normally on next boot!

HOWTO: Figure out whose is using space in the Recycle Bin Folder

I was troubleshooting a low disk space alarm on a server.  After running TreeSizeFree, I discovered that the bulk of the space was in use in the Recycling bin which is stored in a hidden directory called #:\RECYCLER (I say # because on exists on each drive present in the machine).


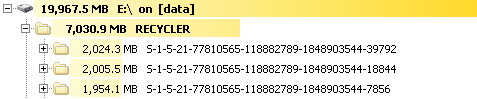
You’ll note however that windows doesn’t store the username that deleted the files but rather the SID of the user.  Now one could argue that if it’s in the recycle bin already then that’s tantamount to bringing your garbage to the curb and thus can be removed at any time.  With that said, I still like to confirm the data first with the user if possible, mostly so I can explain the importance of either using “shift-delete” to permanently delete data or by regularly emptying the recycle bin.  An ounce of prevention and all that.


At any rate, I now have the requirement of understanding just who S-1-5-21-77810565-118882789-1848903544-39792 actually is.


It turns out you can run a vbs script to tell you that.  (Source code below)


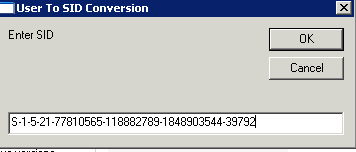
When you double click on from explorer, you’ll be given a Windows message box.  Copy and paste the SID here and press OK:


Continue reading

HOWTO: Use Word as your WordPress Publishing Platform

Did you know that since Word 2007, Microsoft natively supports publishing directly to WordPress? It’s true! Why would you want this? In my case, I regularly create documentation at work that would likely be useful to a wider audience.

I create this documentation in Outlook and unfortunately due to the HTML rendering engine used in Outlook, the formatting never comes out right, especially around bullets. However, if you publish from Word, it takes care of all that translation for you!

At a high level, it works like this:

  • Enable the Publish as Blog Post function in Word
  • Create an account on your wordpress site to be used by the login page (Note the login happens over HTTP so you don’t want to use your administrator account)
  • Set up your account in Word and point it at your xmlrpc.php file on your server

The Details

  • Login to your wordpress site and go to Users and Add User
  • Pick a username and assign Editor permissions.

Continue reading

Automated Macrium Reflect Backups to ISCSI Storage

This HOWTO will allow you to accomplish the following tasks using Macrium Reflect:

– Detect if a external NAS device is powered on and if not, power it on for the duration of the backup and power it down again
– Wait for the web management interface of the NAS device to come online before starting the backup
– Use Powershell to connect to the ISCSI target by verifying several characteristics of the NAS and assign it to a known drive letter
– Start a Reflect Backup and write to this data store

Click below read more link to check out the full source code!

Continue reading

HOWTO: Install a Slackware Linux BIND DNS Server From Scratch

This HOWTO describes how to set up a Slackware Linux based BIND9 virtual DNS server.  The background on why this HOWTO came to be is that I recently received a renewal notice for my domain vanlab.net.  I haven’t used this domain for anything in nearly a year.  Not wanting to pay for DNS hosting or use someone else’s DNS servers, the domain has as a result sat idle.

It occurred to me last night though hat anything this domain would ever be used for would run off my laptop.  Since I’m the only one that would ever use it, it would be fine if it only was available when I was studying.  Therefore I decided that it would be feasible to host my own "part time" DNS server.

I opted not to use any flavor of Windows for three reasons:   First, I wanted as small a footprint as possible as this is a VM that will be running on my laptop all the time.  Second, Windows officially requires a license. (In my mind, this is a "production" implementation so I wanted to find something legal). Third, I’ve always wanted to see if I could make a useful Linux server and I finally came up with a use case.

What follows is how I’ve managed to successfully get my laptop to run a virtual machine that can resolve external DNS queries for vanlab.net.

Software

  • We will be using SMS or Superb Mini Server (http://sms.it-ccs.com) as our Linux distribution of choice.  After much trial and error with multiple distros, I found this one the best as it includes a tool called Webmin that provides a graphical web based interface for configuring BIND
  • (There is a wiki page for configuring this server at http://sms.it-ccs.com/wiki/)
  • Download the SMS64.Live.CD-2.0.5.iso file.  Note: We are downloading the live CD and will install to the HD rather than the full installation despite the recommendation by the distro.  I tried to install the full version but couldn’t get it to boot.  It also includes almost 3GB of packages, almost none of which I needed for this project anyway

Domain Configuration

  • My domain is registered with dyndns.org.  I first needed to configure the name servers for the domain.  I logged into the management interface at https://account.dyn.org
    and went to / My Zones Domains / Domain Registration / Edit Name Servers
  • I added two entries (as a minimum of two are required) for ns1.vanlab.net and ns2.vanlab.net.  I then created two glue records by the same name and pointed both of those IPs at my Shaw public IP of 175.0.103.66.  (An IP that hasn’t changed in 2 years so it’s nearly public anyway)

Continue reading