Blackberry 10.3.2 Feature Requests Poll

I am a big fan of the traditional Blackberry philosophy of building hardware and software that can get work done quickly in as few steps as possible.

With the release of OS10, Blackberry effectively had to build a new OS from scratch.  This is a ton of work and as a result, many of the refinements that were added to OS7 over the years are now missing. I have read many forum posts of people requesting feature x to be added back to the platform.  Blackberry has finite resources for development and testing and simply can’t implement everything all at once.  As a result, these posts become effectively nothing but noise.  It was clear to me that forums alone are an ineffective method for getting Blackberry the information it needs for what features to implement next.

What is required is a “single source of truth” or a curated list of all requested new features and the relative popularity of each.  I have decided to take ownership of this problem and attempt to solve this at a global scale by providing a common platform for everyone to voice their requests.

I have created a new voting poll that I intend to be a living list of new feature requests for the Blackberry 10 operating system.  I am formally offering myself as the official curator of these requests.  You can see the first iteration of the poll below that includes a number of feature requests that I personally have after using my Classic for several days.  My hope is that others will review my list and if they agree can vote on those items.  Alternatively they can add their own.  I will be monitoring the new submissions and if they don’t already exist or are not entirely unreasonable I will add them to the poll.

Below is the poll and the questions.  Please if possible leave feedback either here or on the official poll website (available at http://poll.fm/536y9) as the feedback is required to correlate the numbers in the polls to show the relative interest in a given feature and to give this poll the weight it needs to have any hope of affecting change.

If you have any questions, comments or suggestions, please leave them in the comments as well.  I want to make this a tool that the entire Blackberry community can leverage and maybe, just maybe influence the behavior of Blackberry itself!

If you would like to see new feature requests added to this poll or changes to the existing entires, please add the entry to the “other” field in the poll and then leave comments on how you feel your idea should be implemented.


View the post for details on each feature request


Continue reading

HOWTO: Easily delete folder paths with long names – for free!

If you’ve been in IT for any length of time, you’ve run into issues where you’ve been asked to delete folders that users have created that are longer than 260 characters.  If you try to delete the folder, you get something like:

image

So you start Googling and invariably you’ll find the same tool recommended over and over again – the Long Path Tool from www.longpathtool.com.  I have to give the guy that wrote it credit.  He has completely saturated the search engines with his solution for a problem that by all accounts shouldn’t even exist.  At any rate, you grab his tool and try to run it only to be greeted with:

image

I don’t know about you, but I all but refuse to buy a tool for something that should be a solved problem in 2014.  I knew that robocopy was a built-in tool for every windows installation and I knew that it had support for paths up to 32,000 characters long.  I thought I could use that.  Unfortunately robocopy doesn’t offer any native support for delete data, only copying it as per its namesake.  But with robocopy being the only native tool I was aware of that could solve the problem of deleting folders with long file names, I decided to spend some time with it.

If you think outside the box a bit, you quickly realize that robocopy can delete folders if you approach the problem from a different angle.  Robocopy has a “mirroring” function that will mirror a source folder to a destination folder.  If the source folder is empty, the contents of the destination folder are deleted.  Ah ha!

I decided to try and wrap this idea around in an easy to use PowerShell cmdlet.  I ended up falling way, way down the rabbit hole on this one as I strived to create the most comprehensive and complete cmdlet I’ve ever built.  The objective was to make it robust enough that it could be mistaken for an “official” cmdlet.   I’m pleased to report that I have been largely successful.  If you have an need to delete a bunch of folders that contain long file names, read on to find out how to do so for free!

Continue reading

HOWTO: Unique NTFS Permissions Reporting Tool

If you found this post via a search engine, you’ve likely received a ticket/request from some manager requesting an audit report of the permissions on an important share within your company. Unfortunately for you, this folder contains literally tens of thousands of folders and hundreds of thousands of files.  Oh and since there has been no proper governance of it over the years, inheritance is broken all over the place and permissions are assigned many levels deep with no rhyme or reason.  You’ve now been tasked with cleaning this up.  You realize that trying to analyze this manually is simply impossible so you’re looking for some kind of tool to assist you.  You’ve found tools like the NTFS Permissions Reporter (http://www.cjwdev.com/Software/NtfsReports/Info.html) but quickly found this costs hundreds of dollars in order to produce any kind of intelligible report.  You’re not allowed to spend any money so you’re stumped.  So now what?

I found myself recently in this exact situation and decided to use this as my first real attempt at building a full-fledged tool with PowerShell.  Wait!  Don’t run away yet.  There is nothing to be afraid of here as I’ve designed this tool to be useful even if you have absolutely no PowerShell experience.  Again, you don’t care how you get the report, you just care that it’s readable.  That’s what I’m here to help you with.  The tool to do that I call the ntfsreporter and it works as follows:

  • Accepts a parent folder (can be a local folder or a UNC path on a remote machine)
  • Builds a list of all files and folders including all subfolders and files along with the permissions assigned to each

Here’s where it gets interesting:

  • Compares the permissions on each item to that of its parent.  If the permissions match, it is ignored.  If the permissions don’t match, this means someone has unexpected rights so include it in the report
  • Has the option to easily specify a list of accounts to automatically ignore in the report.  So if you have Domain Admins or some special account that has access everywhere anyway, you can easily exclude it
  • Has the option to include SIDs if desired for user accounts that no longer exist but still have permissions allocated (disabled by default)
  • Clearly identifies what permissions have been added or removed on a per file and folder basis

Does this sound like it might be helpful for you?  Excellent, let’s get started.

Continue reading

HOWTO: Easily Compare AD Attributes Between Users

You guys are in for a treat today.  Have you ever attempted to troubleshoot an issue with an Active Directory user only to find yourself in ADSI edit trying to figure out if any attributes are not configured correctly?  Since you’re often not sure what the value is supposed to be, you’d like to compare it to another known working user. That’s a pretty common problem in Windows IT and I’ve just created a tool that makes it much, much easier to do!  Let me know show you how it works.

When you run this tool, a dialog box appears that looks like this:

image

  • This screen is asking for the users you’d like to display Active Directory attributes for.  You can enter 1 or 2 or 10 different users if you’d like, just be sure to separate each one with a semicolon.
  • It can take a few moments for the AD attributes to load so a progress bar is displayed.  It shouldn’t take more than 5 seconds or so per user.

image

  • You’re now presented with a grid view that contains 3 columns : the username, the attribute name and its value. That’s pretty cool, but that’s not the best part.  The grid view has a built in real time search that automatically searches every single item of text means that you can do some incredibly powerful analytics.

image

Continue reading

HOWTO: Easily Convert Block of Text into an Array in PowerShell

In PowerShell, you will constantly find yourself iterating through collections of data.  Perhaps you have a list of users or folders to process.  Often what ends up happening is you will obtain this data through some other cmdlet.  Perhaps Get-ADUser or Get-ChildItem.  This works well but what happens if you’re testing and you only want to iterate through a subset of this data?  Or perhaps You have a CSV or log file with a bunch of text in it that you need to iterate through?  There are many ways to go about this.  The most common perhaps is saving the data into a file and then using the Import-CSV cmdlet.  That’s fine but it annoys me as if I’m just testing, I don’t want to create more files I’m likely just going to forget about anyway.  Another option is to declare an array.  This is better but you have to wrap each line in quotes.  If you are copying and pasting 100 rows from notepad, you have to do extra work to add these quotes.  That’s no good.  To solve this once and for all, I have spent a bunch of time trying to come up with the quickest and easiest possible way of adding a block of text and converting it into an array.  I’d like to share it with you.

The core feature we are going to take advantage of here is something called a here string.  A here string can be thought of as a block of text where PowerShell doesn’t attempt to interfere with any special characters it may find.  In our case, we’re going to take advantage of the fact that here strings do not strip out the new line (aka carriage return). 

Let’s say that we have a list of processes in notepad that we want to get details on.  That list look like the screenshot below.  Not that there is absolutely no special formatting or additional characters, just as you’d typically find this kind of data "in the wild".

image

What’s the fastest possible way to get the details of these processes? 

Continue reading

HOWTO: Count Unique Groups of Items in Excel

I find myself constantly in a situation where I have a giant list of data and I need to know which entries in that data occur most frequently. I’ve always used Excel pivot tables for this purpose.  Recently someone saw me solve a problem using this technique and they were very surprised and wished they’d known this years ago. With that in mind, I figure I’d share my technique.

Let’s create a made-up scenario for demonstration purposes. Let’s say you want to know which DLL on your computer loaded in memory most frequently. The scenario doesn’t matter, it’s just an excuse to generate some data.

Ultimately, you’re going to end up with Excel open with a bunch of columns of data similar to this:

As you can see, we have 2,092 rows of data with the fourth column being FileName. We want to produce a list in order of frequency of which DLL is listed most often. To do that complete the following steps:

  • Select either the column you’re interested in or the entire sheet depending on your needs
  • Select Insert / Pivot Table
  • The range will default to what you selected. Since you selected all the data, simply press OK

Continue reading

HOWTO: Export and Compare Security Policies between 2 different Windows Machines

Today I had a need to compare the local security policies between two domain controllers to verify the audit configuration on each. I figured this could be easily achieved using the Security Configuration and Analysis MMC built into Windows. The tool seems to work well with comparing with pre-defined baselines but for the life of me I could not figure out how to export the current configuration for analysis on another machine. While this proved to ultimately be fruitless, it did lead me down a several hour rabbit hole that thankfully did ultimately result in a solution.

The solution ultimately was looking outside of the core Windows OS to a free download from Microsoft called the Security Compliance Manager. That can be found here:

http://technet.microsoft.com/en-ca/solutionaccelerators/cc835245.aspx

Note: This is a 132MB download and requires a SQL server to install. I installed SQL 2008 R2 Express on the same machine without issue. If you’d like to know how I configured SQL, see this blog post:
https://pleasework.robbievance.net/howto-configure-server-performance-advisor-to-troubleshoot-domain-controller-performance/

Otherwise the install is simply a next, next finish kind of thing.  Once it’s installed, you can launch it from your start menu. The first time you launch it will likely take 5+ minutes while it loads in all of the policy modules for all of the supported products. Once it’s installed, you should see a screen similar to this:

At this point, you might be thinking as I did that somewhere in the UI you would tell it to scan a remote computer to pull its current configuration. I’ll save you some time and tell you that the Security Compliance Manager does not allow you to import live configurations. It only works for comparing baselines. That obviously doesn’t help us much. If you look in the top right, you’ll see an option for Import GPO Backup (folder). Don’t be fooled as I did. This is not just for GPOs but can also import the local security policy from a machine. The question now becomes, how do you generate the configuration? After much more digging, I discovered, almost by accident, the following file that was generated as part of the installation of the SCM:

“C:\Program Files (x86)\Microsoft Security Compliance Manager\LGPO\LocalGPO.msi”

Continue reading

HOWTO: Find Specific Exceptions to Use with Try/Catch in PowerShell

Consider the following scenario. You run a command in PowerShell. It fails. It generates tons of scary red text. You don’t like this. You want to display a more friendly error message. Or better still, you want to take some action based on the error.

With PowerShell, you can do this easily with something called try / catch statements. There is lots of documentation online for how to use these. However, one thing I found difficult to figure out was how to define specific exceptions. Consider this code block:

Try {
# Do something
}
Catch [SpecificExceptionGoesHere]
{ # Do something else if the above fails }

The problem I’ve had is figuring out what exactly you type in the yellow box. I’m pleased to report I now have an easy way of figuring it out.
To do so, you first need to intentionally cause the error you want to capture. Once you’ve done that you can extract the exception text.

Oh, I should probably mention that PowerShell automatically saves all Errors in a custom variable called $Error and that the most recent error is always available from $Error[0]

Let’s dive straight into an example. Below we’ve run a simple cmdlet (in this case Get-ChildItem) against a file we know doesn’t exist. It generates an error.

Continue reading

HOWTO: Fastest Possible Way to Make Custom Objects in PowerShell

I make use of custom objects constantly in PowerShell.  Having the ability to easily combine and present data is incredibly powerful.  Since I use them so much, I’ve found myself wanting to make them as fast and easy as possible to create. After much research and experimentation, I think I have created one of the single fastest and easiest ways of making custom objects in PowerShell – and I wanted to share with you.  Ready?


$C=@("Column1 Column2 ColumnXX Column99")
$myObj=@();Function Add-ToObject{$C=($C -split ' ');$i=0;ForEach($R in $C){$P+=@{$R=$Args[$i]};$i++;};$Script:myObj+=[pscustomobject]$P}

Update: I managed to shrink this function down even further by collapsing some functions into others and making some other tweaks.  If you think you can get this shorter, (even by a single character!), please share how in the comments:

$C="User ComputerName Email OS"
Function Add-ToObject{$args|%{$i++;$P+=@{$C.split(" ")[$i-1]=$_}};$Script:myObj+=@([pscustomobject]$P)}

To make the script a little easier to understand, here it is again, but this time in its full expanded form:

image
I’ve effectively gotten the process down to 2 lines for any number of custom properties! But it’s even better than that.  You can ignore the second line entirely.  Instead just concentrate on the first line where you define the columns you want in your custom object.  If you want to add another column, just add it to the end separated by a space.  If you want to remove a column, delete the name.  That’s it!  Let’s look at a real world example.

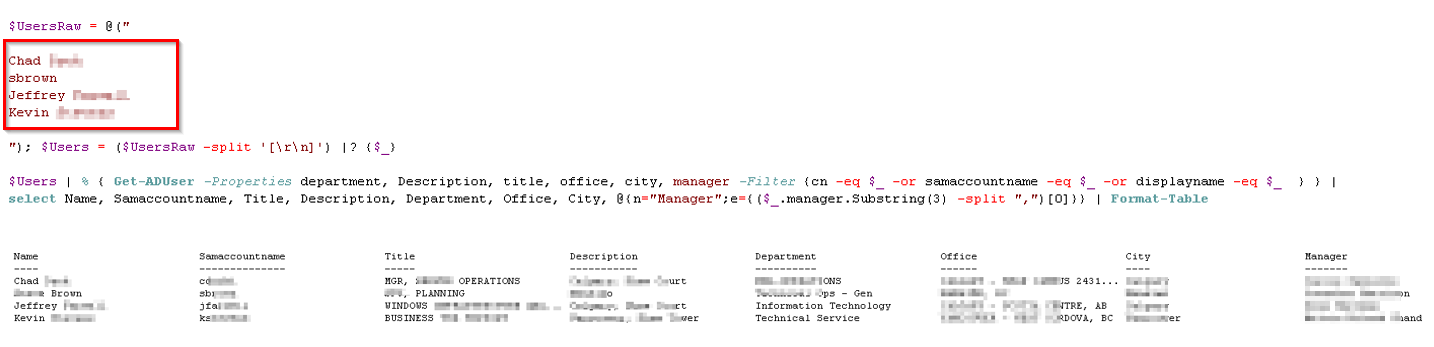
Imagine a scenario where you need to identify all of the users running Windows XP in your environment and send them an email saying you need to upgrade.  To do this, you need to produce a list of all of the computers in your network, the operating system they run as well as the user that manages/owns it along with their email address.  This information must come from two different cmdlets (Get-ADComputer and Get-ADUser).  How can we combine these results into a single object for easy output?

Step 1) Copy and paste the two lines above at the top of your script and modify the column names and quantity to match your needs

Step 2) Write the code that generates the data that you need

Step 3) Once you have the data gathered, call the function Add-ToObject and pass in all the data you data you want.  Since these are objects, this can be any kind of data

Step 4) Output the results from the variable $myObj.  (You can change this if you want but I often find for quick work I’m doing, I just need a single object so sticking with a standard name is useful for smaller projects)

image

Continue reading

HOWTO: Quick Lookups for Active Directory User Details

I’ve recently started a new job at a large company with thousands of employees and so I have a constant need for looking up who people are, what their user name is, who their manager is, what city they are in, etc? In many cases, I have to look up entire batches of people. Initially I just using Active Directory Users and Computers and searching each user and then going to each tab for the details I need. After a few times of that though, I found the process maddeningly inefficient and decided to automate it.

The script below is pretty simple but it does have a few cool features.  First off, to get user details, all you need to do is copy and paste your list of names red box area and run the script.  There can be one name or many.  They can be SAMaccountnames, display names or canonical names, it doesn’t matter as the script will figure it out and display the results in a table.  Second, normally with Powershell, you have to encapsulate each name in quotations.  Since I’m often copying and pasting the names from other sources, this adds extra busy work.  My script obsoletes that and allows you to paste in the plain text and it’ll automatically convert it into an object PowerShell can use. Lastly, it’s pulling data that otherwise requires access to at least 3 different tabs in ADUC to view.

It’s otherwise nothing fancy.  The idea for me is that since I always have PowerGUI (my PowerShell IDE of choice) open anyway, I can just alt-tab and quickly paste in the names, press F5 to run the script and figure out who does what.  It’s been incredibly useful for me already so I figured I’d share.

userdetails

 
Continue reading