Earlier this year I was fortunate enough to spend the day with Mike MacGillivray, a Professional Field Engineer from Microsoft that specializes in Microsoft Public Key Infrastructure or PKI. During that meeting we ended up building a brand new Microsoft PKI platform in our development environment. I ended up taking a ton of screenshots and documented the process as best as I could. Since I had this content anyway, I have opted to share what I have. Note that I have obfuscated any details that would be deemed company specific. Fortunately, since this was built in our development environment, there isn’t a lot of that. Without further ado, I present a guide to building a Windows 2012 R2 Public Key Infrastructure.
Through this you will build and configure:
-
A Windows 2012 R2 PKI Root Server
-
A Windows 2012 R2 PKI Issuing/Enterprise Server
-
Certificate Revocation Lists (CRLs) published through IIS configured through (in our case) an Exchange Client Access Server (CAS)
-
Certificate Web Enrollment
A high level break down of the environment is shown below:
The remainder of this email describes the specific steps necessary to create and configure a PKI environment. Before we begin you will need:
– Windows 2012 R2 server that is not joined to the domain that will host the offline root certificate. This must be protected at all costs (FSRVDEVRCA1)
– Windows 2012 R2 server that is joined to the domain. This is the enterprise/subordinate/issuing CA and will be used to issue and revoke new client certificates (FSRVDEVECA1)
– Highly available IIS Web Server to host the CRL. We have selected to use our Exchange Client Access (CAS) servers for this purpose (FSRVDEVCAS1)
Configure IIS CRL Host Server
– Create a folder called \\FSRVDEVCAS1\E$\PKI which will house the CRL and public key
– Share out this folder as PKI and modify both the Share and NTFS permissions to give Cert Publishers the Change permission
– By default your IIS site isn’t configured to allow access to the PKI folder so no clients will be able to access the CRL. To resolve this, open the IIS Management Console and from the Default Web Site choose Add Virtual Directory
– Make the alias PKI and point to E:\PKI
– Certificate file names sometimes include the plus sign (“+”) in their file names. IIS interprets this as a possible attack however and blocks the request. To disable this behavior, select the PKI virtual directory you created and choose Configuration Editor
– From the drop down above choose system.webServer/security/requestFiltering
– Change allowDoubleEscaping and set it to True
– Press Apply
– Note: A restart of IIS is not required
– As we want to ensure that our PKI CRL IIS server can be be moved at a later date, create a DNS CNAME record called pkidev.[domain].local and point it at FSRVDEVCAS1.[domain]
Install Standalone Root CA
– Note: Ensure your server is not joined to the domain before proceeding. (Remember that deploying a new VM through a template can do this automatically)
– Install Certificate Services Role on FSRVDEVRCA1. Note the installation is effectively next, next finish
– When prompted for role services, choose only Certification Authority
– When you are finished, select the Configure Role option from Server Manager for the newly installed role
– You will be asked for credentials here. Be sure to use the local administrator account. Note that the credentials are only used for installation and are not used for service accounts
– Select Standalone CA (as this server is not joined to the domain the Enterprise CA option will not be available)
– As we are creating a net new Certificate Authority, choose Root CA. (Think of this as creating a new Domain in a New Forest versus a child domain in an existing forest)
– Select Create a new private key. We would use the existing private key option if we were trying to restore an existing PKI environment onto a fresh server and restoring the key from a backup
– Change the Key Length to 4096 bit. Note that this is now the standard and Microsoft has dropped all support for keys less than 1024 bit in length
– Leave the default cryptographic provider and hash algorithm
– For the Common Name type in the format [DOMAINNAME][PURPOSE]-CA (ie [DOMAIN]ROOT-CA or [DOMAIN]ENTERPRISE-CA)
– For the Validity Period, choose 20 years. This has become a defacto standard in the industry and is used in conjunction with the half rule
– The “half rule” states that you always create a validity period half of what is allocated to the parent certificate
– The logic is that if you issue a new certificate to a child CA in year 19, it will only be possible to issue certificates of a maximum of 12 months because of the expiration
– By using the half rule, you ensure that child certificates can always be issued for the maximum allowed duration
– Verify the configuration settings you have selected are correct and press Configure
– Mike was kind enough to provide some command line post-configuration scripts for us that we can use to automate the configuration process
– The files are primarily batch files and are available here
– This script does the following:
– Set the Active Directory configuration store to be made aware of the present of the new certificate authority
– Sets the CRL publication intervals
– Defines the CDP (Certificate Distribution Point) URLS
– Defines the AIA (Authority Information Access) URLs
– Enables Event Log Auditing
– Sets the certificate validation period for the certificates it will issue to half of that of the root CA (10 years)
– Once the Certificate Services role is installed, you must first publish a new CRL. Open the Certificate Authority management interface, right click on Revoke Certificates and choose All Tasks and Publish
– Now that the CRL is published, we must copy it a domain joined computer so that it can be added to the Active Directory configuration store so all computers in the domain receive it
– Copy the .crt (FSRVDEVRCA1_[DOMAIN]ROOT-CA.crt) and .crl ([DOMAIN]ROOT-CA.crl) files from your root CA (c:\windows\system32\certsrv\certenroll) folder to any domain joined system (We’ll use our CAS box)
o The .crl file is the Certificate Revocation List file itself
o The .crt file is the public key of the root CA that we will push to all clients.
– Switch over to your domain joined computer where these files now reside (ie your CAS box) and run the following two commands as an administrator logged in with Enterprise Admin rights:
Certutil –dspublish –f FSRVDEVRCA1_[DOMAIN]ROOT-CA.crt RootCA
– The “RootCA” suffix tells the system to place this in the “Trusted Root Certification Authorities” store of each machine in your domain
Certutil –dspublish –f [DOMAIN]ROOT-CA.crl
This publishes a copy of the Root CRL into Active Directory. Important Note: This *MUST* be re-published every 6 months or all authentication for all certificates will fail!
Enterprise CA Installation
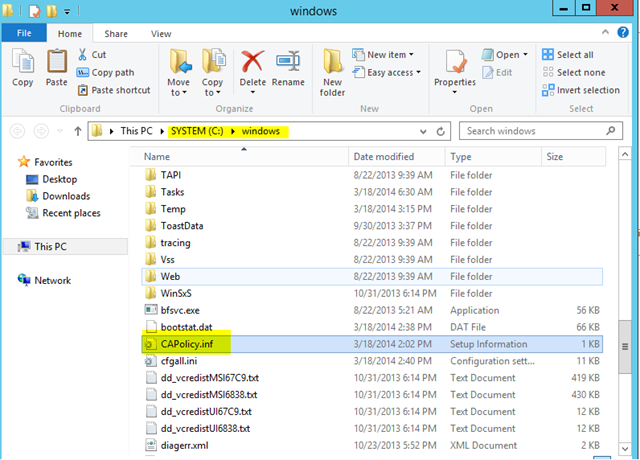
– Next, from Mike’s zip file (Note: Not available here due to publishing restrictions), copy /issuing/capolicy.inf (you’ll need to rename it from .txt) to C:\WINDOWS of your new Enterprise CA. Note this must be done before installing certificate services
– Complete the installation of the Certification Authority role on the new server
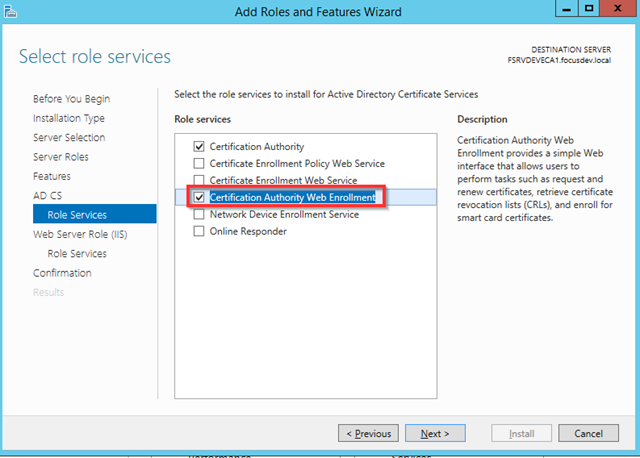
– Check Certification Authority and Certification Authority Web Enrollment
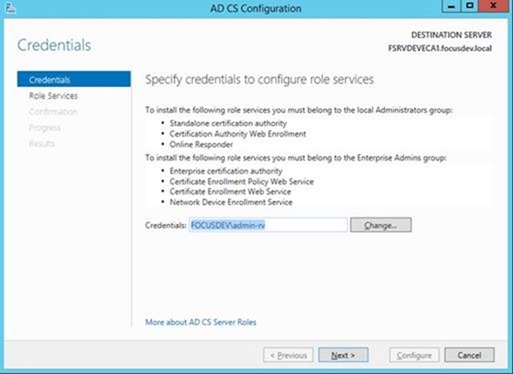
– Once installed, choose the Configure option from Server Manager
– Note: This account is ONLY to install and is NOT used for any service accounts
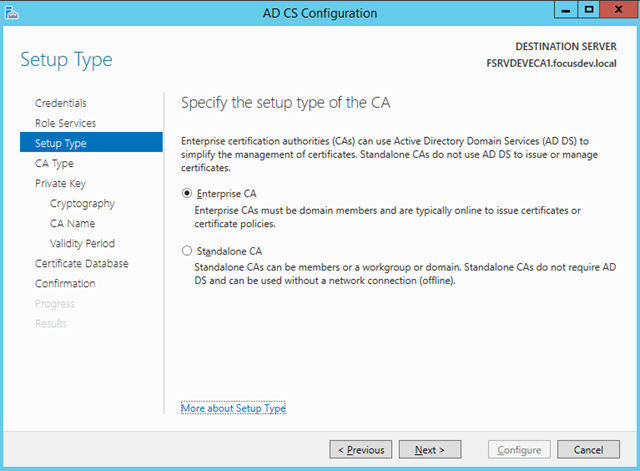
– Select Enterprise CA as this is now a domain joined system
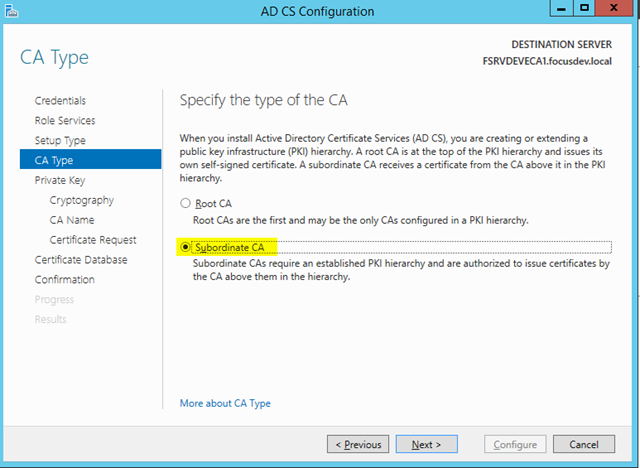
– Choose Subordinate CA as our Standalone we created earlier will be the root
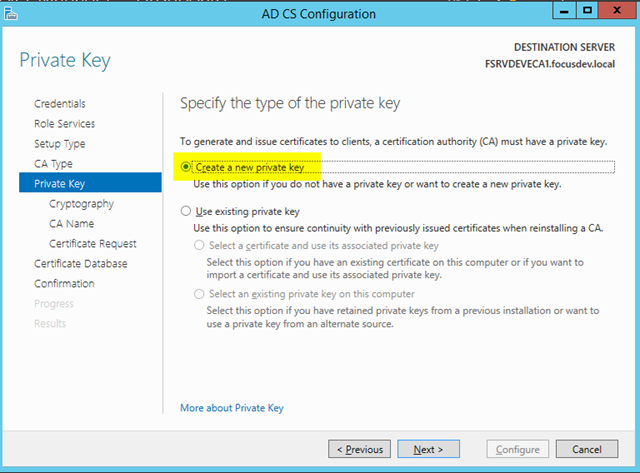
– Create a new private key as this is the unique key for the subordinate CA
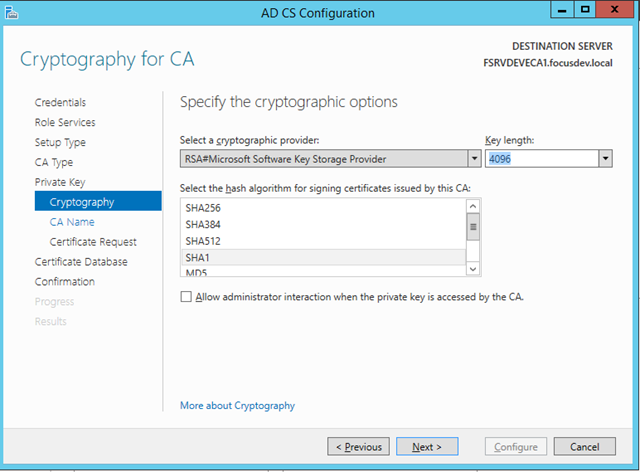
– Just as with the root CA, choose a Key length of 4096 bit
– As before use the naming convention [SERVERNAME]-[PURPOSE]-CA so [DOMAIN]-ENTERPRISE-CA
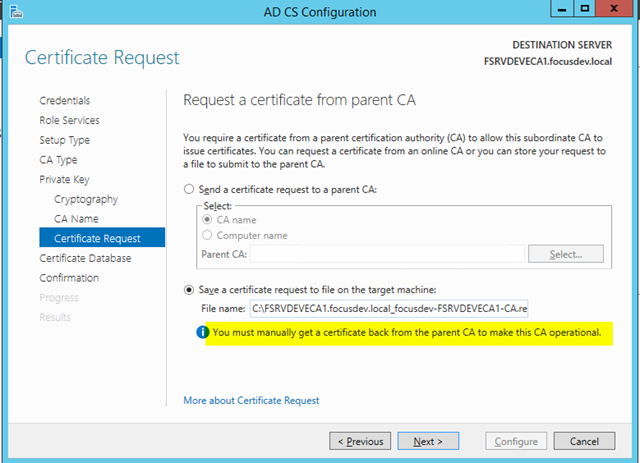
– Select Save a certificate request to file on the target machine. We need the root CA to sign this key but since the root is by definition not on the network we need to transfer that key to the root (either by USB or SMB)
– Verify the configuration is correct and press Configure
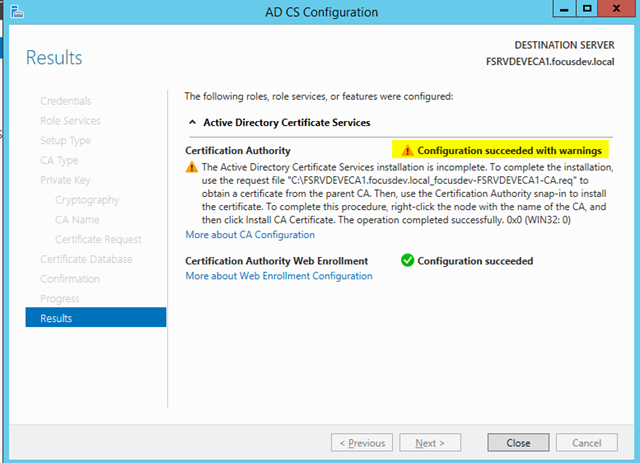
– You will receive a warning. This is expected. It’s telling you that the root CA is not contactable and that you must sign this Subordinate Private Key manually as noted above
– This certificate will be automatically placed in the root of the C:\ drive on your issuing server
– Copy this .req certificate file to the root CA
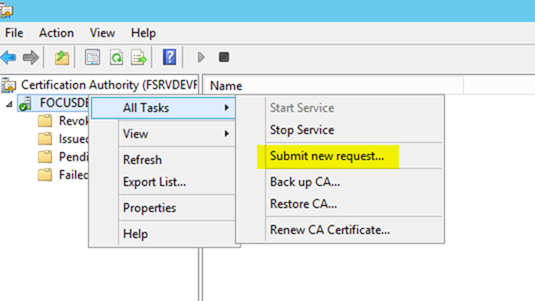
– From the root CA management window, right click at the root of the certificate tree and choose All Tasks / Submit new Request
– You will be given a browse file dialog. Select the .req file you copied from the subordinate server
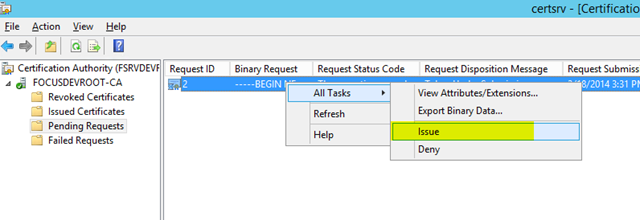
– Note that it will seem as if nothing happens. However, if you look in the Pending Requests section, you’ll find the request in the queue
– Right click on the pending request and choose All Tasks / Issue
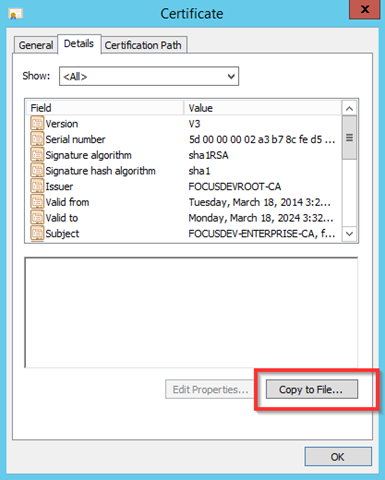
– Jump to the Issued Certificates section. Double click on the issued certificate and go to the Details tab and select Copy to File
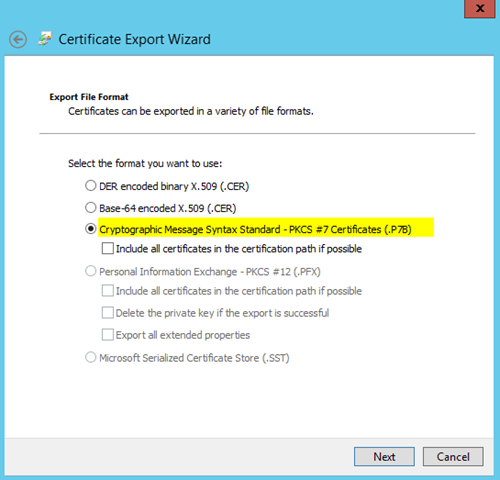
– Export the file as a .P7B file – Note: This is not the default
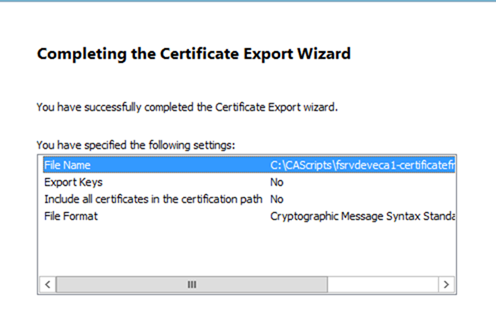
– You will be asked to save the file. Give it a meaningful name and verify the type is *.p7b and press Save
– Review the completion progress and close the window once satisfied
– Copy the file you just exported back from the root CA onto the Enterprise CA
– Delete the .req file on the enterprise CA in the root of C:\ as it is no longer required
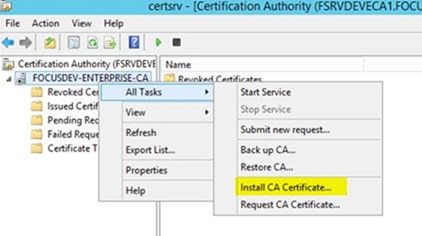
– From the Certificate Management console on the Enterprise CA, right click on the root, choose All Tasks / Install CA Certificate
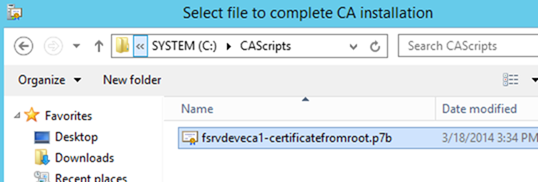
– Browse to the file you just copied
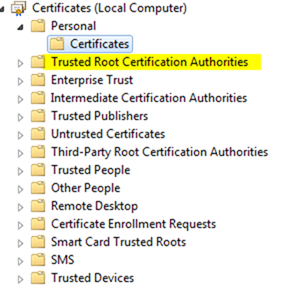
– Note: If you get an untrusted error when importing the certificate, press cancel and check that the root certificate is present in trusted root store of the subordinate CA. (This happened when you used the dspublish parameter with the certutil command above)
– From the root CA by using the local Certificates MMC snapin and choosing the Local Computer store
– If it is not present run gpdupate /force to make the local computer update its certificate store from Active Directory
– Try installing the CA certificate again and it should work this time
– The Certificate Service is not started by default. Right click on the root of the certificate tree and choose All Tasks / Start Service
– We now need to run the post configuration script provided by Mike in /issuing/issuing-caconfig.bat (you will have to rename this from .txt).
This script will:
– Set the Active Directory configuration store to be made aware of the present of the new certificate authority
– Sets the CRL publication intervals
– Defines the CDP (Certificate Distribution Point) URLS
– Defines the AIA (Authority Information Access) URLs
– Enables Event Log Auditing
– Sets the certificate validation period for the certificates it will issue to half of that of the subordinate CA (5 years)
– After running the post configuration batch file, we need to once again publish the CRL by right clicking on Revoke Certificates and choosing Publish. (Note that we will not be using Delta CRLs in our environment)
– We now need to copy the public key portion of this new certificate to the IIS folder that will act as our CRL CDP.
– Copy “C:\windows\System32\certsrv\CertEnroll\FSRVDEVECA1.[Domain].local_[Domain]-ENTERPRISE-CA.crt” from issuing CA to your PKI folder on your IIS server
Configure Certificate Web Enrolment
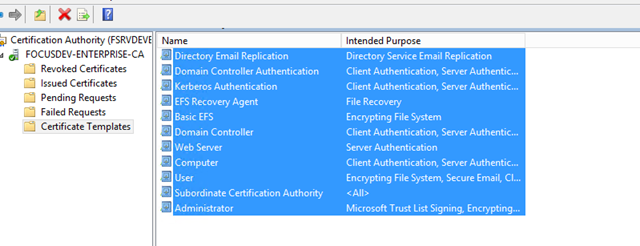
– On the Enterprise CA, select Certificate Templates, highlight all of the default templates and choose delete (these are still stored in Active Directory and so this action just prevents them from being selected)
– Next we want to allow web enrollment which lets users request their own certificates from a webpage. However, this feature requires SSL and a valid certificate – which we can now issue
– Right click on Certificate Templates, choose Manage. Find the template called Web Server, right click and choose Duplicate Web Server”
– Select the General tab and fill in the display name as
– Select the Security tab and add the computer account for the Enterprise CA that is issuing the certificate
– Give this computer account Read and Enroll permissions
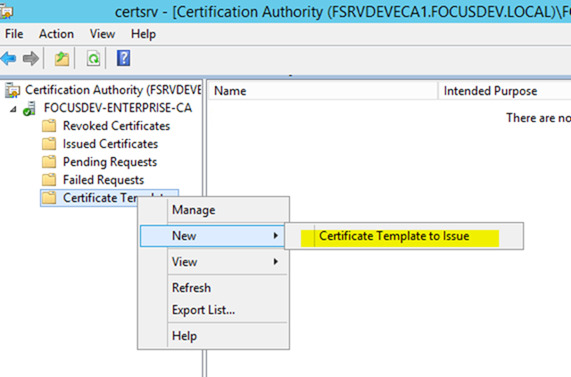
– From the Enterprise CA, right click on Certificate Templates and choose New / Certificate Template to Issue
– Scroll down and select the certificate template you just created
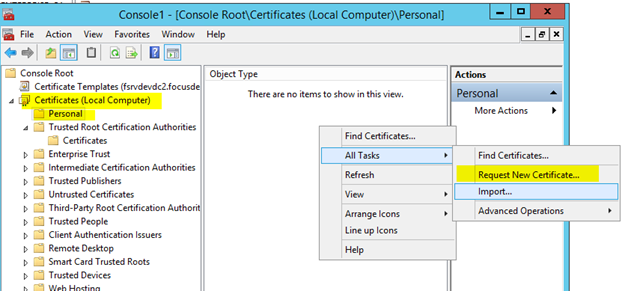
– Log into the IIS server that your CRL is hosted on (in this case our Exchange CAS Server), open the Certificate Management console for Local Computer
– Select the Personal store and choose Request New Certificate
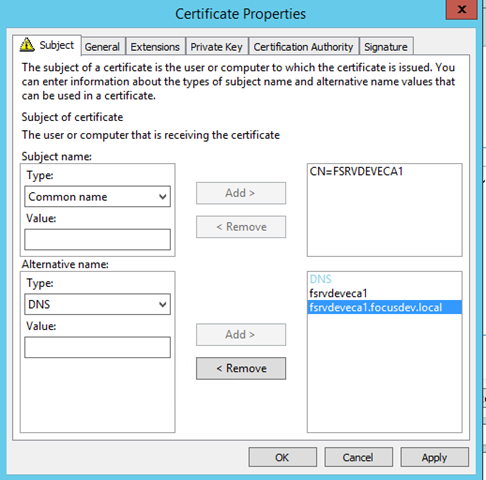
– View the properties of the certificate as we need to add some Subject Alternative Names (SAN) to this certificate
– For the Subject Name, select Common Name and type in the name of the server it was applied from (in this case FSRVDEVECA1)
– Under Alternative Name, select DNS and type in both the NetBIOS name as well as the FQDN for the server. (Note the screenshot below does not include both but should)
– Press OK. This certificate is now present on the IIS box and can be used within IIS to create an SSL secured website
– If you’re reading this far, then I’m impressed! Have a cookie
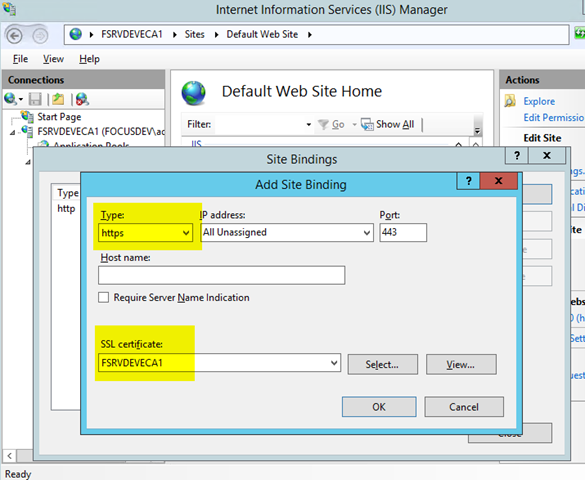
– Open up the IIS Management console on your Enterprise CA
– Right click on the Default Web Site and choose Bindings
– Add a new binding for https (All Unassigned and no hostname) and select the certificate you created above
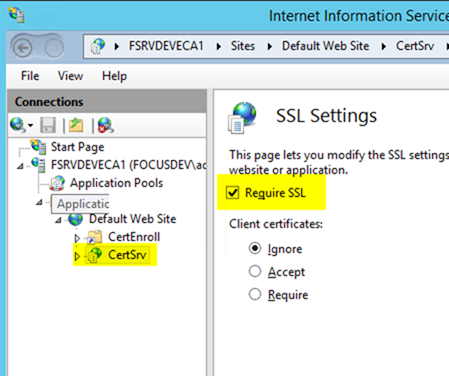
– With the CertSrv virtual directory selected, choose SSL Settings and check Require SSL
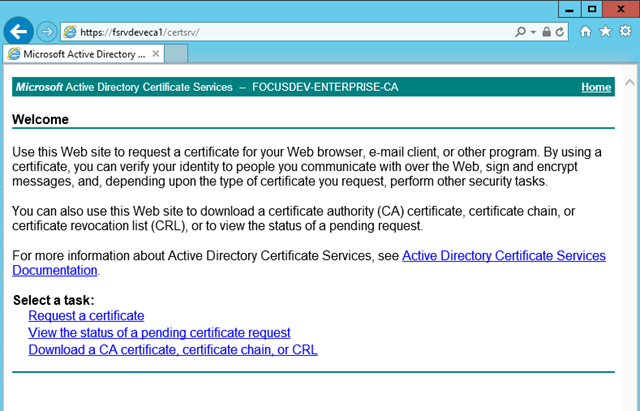
– Users can now access the enrollment page at https://[enterprisecaservername]/certsrv
Congratulations. You now have a fully functional Certificate Authority PKI including an offline Root!
Next steps include powering down the Root VM and protecting it such that it cannot fall into the hands of those that shouldn’t have it or the private keys it contains.










3 comments
1 pings
Hi and thanks for the scripts ill download now – ps when installing the pki enviroment how did this behave with your current root certs ? im under the impression that i can go ahead and build a pki enviroment and issue the new cert and the old one will gracefully expire and the new one take over , is this correct ?
Thank you
Matt
Hi Great Guide , however the section about post configuration points and the ” script isnt available” ??? so how are they configured as per your guide and naming within the guide ??
Thanks
Hi Matt,
Fair point. I reviewed the scripts provided and there doesn’t seem to be anything sensitive in there. Perhaps I was just being too paranoid when I originally created this post. I have since updated it with the scripts. You can find them here: pleasework.robbievance.net/PowerShellScripts/pki.zip
(Note: They are not actually PowerShell Scripts but rather just a series of batch files.)
Since this came from the Internet it should go without saying but this is provided AS IS and I cannot be held responsible if this blows up your PKI environment. Please review each line in the script before executing, especially since I don’t even recall exactly what they do anymore!
Good luck!
[…] http://pleasework.robbievance.net/howto-install-a-2-tier-windows-2012-r2-ad-integrated-pki-infrastru… […]