HOWTO: Write Japanese on a computer

I’ve decided to try to learn some of the basics of the Japanese language.  At first I thought I’d limit myself to memorizing some spoken phrases only but I found myself increasingly curious with how the Japanese writing system works.  I installed the Japanese keyboard on my tablet and… was immediately overwhelmed.  “How could anyone make sense of this?” I thought.  Rather than leave that as an open question however, I decided to answer it. I put the results of my research into a bite sized digestible blog post.  This is not designed to teach Japanese (because lord knows I’m the least qualified person in the world to do so) but rather describes how to simply write Japanese on a computer and in doing so demonstrates how incredibly complex the entire process is.  I have a whole new respect for the Japanese people for being able to make this language work.

If you’ve ever been curious how basic Japanese comes together into a coherent form but didn’t ever care enough to actually investigate yourself, this blog post is for you.


This HOWTO will describe what I have determined to be the requisite knowledge required to write Japanese on Windows Desktop Computer. In this example we will be using Windows 8.1.

  • First, Install the Japanese “Input Method Editor” (more commonly known as an IME)
    • Go to Start / Control Panel / Language
    • Choose Add a Language
    • Select Japanese and press OK.
  • You will now have the IME appear in the bottom right corner of your screen
  • By default, it will show up with an English “A” to indicate that you are typing with the English

  • Click on the “A” once and it will change to the character which also sounds like “ah” in Japanese
  • Right click on this system tray icon and you will be presented with a menu

Continue reading

I have a wall!

My certification journey has produced its first physical fruit.


Microsoft, what are you doing!?!

Windows 8.1 has now been officially released.  I tried to download the update but ran into a design decision Microsoft has made that I honestly can’t explain.


I discovered the only official way to download Windows 8.1 is by logging into the Windows Store using your Microsoft account.  I’m not sure if you installed Windows 8 yet but during the installer you’re asked to associate your machine to a Windows Live/Passport account.  They try pretty hard to make it seem mandatory too which how they present the UI.  I saw no value in linking my home personal login account to “the cloud” so I jumped through the hoops to setup a local account.


However, when I try to launch the Windows Store now to download the update, I’m told I need to complete association step in order to proceed.  I opted not to do that and instead started Googling to find a download of the Windows 8.1 installation media.  


It turns out though that Microsoft “has not released the ISO media for Windows 8.1. Please use the Windows Store to upgrade to Windows 8.1.”


Think about the implications of this for a moment.  If you’ve got a 4 computers in your house for your family all running Windows 8 that you’d like to upgrade, you have to go to each machine individually and re-download the 3.5GB installer.  This is compounded by the fact that Microsoft’s download service is slow not only because of everyone trying to get it on release but because so many people are now forced to re-download it that otherwise never would.  Think back to Windows XP SP3.  It was primarily only available via Windows Update.  They did that so it’d only have to download the bits you needed.  However Microsoft also provided a “link for IT professionals” that included the entire thing so that it can be installed offline or for multiple machines.  Microsoft has made that process now impossible.  In fact, based on my research, even small businesses with n number of machines still going to have to upgrade each machine by hand.  Why?  Microsoft is releasing the ISOs, but only for their Enterprise customers with Volume License agreements.  


I just can’t get over how insane a design decision this is.  The only real advantage I can see for them by doing this is that by forcing everyone to upgrade from the source, they can get more accurate upgrade telemetry and statistics along with increasing the install base for their online store, just like they did by removing solitaire from the retail release.  Is that really worth it?


There is apparently a trick that some people have had success with though which involved registering for a Windows 8 trial to get a trial key, downloading windows 8, pausing the download manager at 1%, starting another download which apparently grabs the 8.1 EBD file which saves into some folder 5 levels deep and then using some tool to convert the EBD file into a bootable ISO.  I admire the dedication in the community but seriously?


There are also of course torrents for it.  But this is the first goddamn Windows I outright paid for (Granted it was only $15).  Why the hell has Microsoft abandoned a technique they’ve encouraged since the dawn of high speed Internet — especially considering it’s a free update?


The mind boggles.  I’ll probably end up registering my live account to my Windows 8 install so I can download this thing so they’ll win on that front.  But since Microsoft encourages us to be efficient in their exams, I present an exam question for you:


You are a Network Administrator for Contoso.com.  You have 6 identical Windows 8 machines purchased from the same manufacturer running Windows 8.0 using retail product keys.  All computers are connected to the same ADSL modem with 5mbps of downstream bandwidth.  You need to upgrade these machines to Windows 8.1 with the least administrative effort.  Your solution must minimize bandwidth usage.  What do you do?


I don’t know the answer to this question for certain, but all signs point to d) Suck it up and manually download 21GB of updates and manually go to each machine to install it.


Or it might be c) Wait until Microsoft realizes how stupid this is and releases a standalone installer.


The Right Way to Take Screenshots

Being in IT means I have to take a lot of screenshots for use in various kinds of documentation. With the release of Windows Vista/7, Microsoft included the “Snipping Tool” which proved to be an invaluable improvement over any free solution I used at the time.  That is to say, alt-print screen and mspaint. Snagit was always available but not only was it a commercial product but it grew to be a beast in terms of functionality and size. I just wanted a simple screenshot tool that would allow for simple annotations.

Once I started posting this blog more regularly, I quickly realized I needed a way to obfuscate certain work related screenshots before publication. Using the snipping tool, this proved to be a pain in the butt as there are no shape tools… or anything really. With that in mind I finally decided to sit down and “see what’s out there” for free screenshot solutions. As you might expect, there are many, many of them. Over the course of nearly 2 hours, I installed more than a dozen tools. Some promising, some crap but none of them did exactly what I wanted.

My objective was to find a tool that had that met the following requirements:

  • Tiny in file size, memory footprint and UI
  • Portable (that is to say no installation is necessary
  • Supports keyboard shortcuts so I can press a single key combination to select a region of the screen
  • Simple annotation tools (I would have been able with the ability to draw only boxes)

Continue reading

HOWTO: Create an artificial slow WAN connection

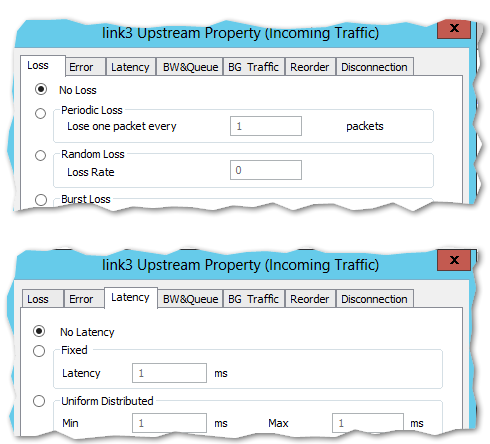
I’m studying on BranchCache and needed a way to simulate a low speed WAN connection. I found someone who referenced a tool written by some guy who works for Microsoft called the Network Emulator for Windows Toolkit.  It allows you to simulate just about any kind of network connection or network level of reliability.


You want a connection with 60ms response time, 2% packet loss and 512k down and 128k?  You got it.  I took a few sample screenshots from the product as I was testing it out:


Continue reading

HOWTO: High Level Configuration of Dynamic Access Control

I have been playing around with Dynamic Access Control in Windows Server 2012 for a few hours now and finally got it doing something useful. I wanted to document in broad terms what steps were needed to configure DAC:


  • Edit your default Domain Controllers policy and enable support for Claims
    • Claims are essentially the ability to perform authentication look ups based on any attribute stored in Active Directory
    • Computer Configuration / Policies / Administrative Templates / System / KDC / KDC support for claims, compound authentication and Kerberos armoring = Enabled


  • Open up the Active Directory Administrative Center and go to Dynamic Access Control section
    • Select Claims Type
    • Create a new claim type for the AD attribute you want to authenticate with (ie Job title)
      • Select the AD attribute from the existing list, give it a friendly name and set the Suggested Values to what you’re going to look up
    • Select Resource Properties next and go to New / Reference Resource Property
      • Choose the claim type you created before and assign it either a multi-value choice (This will allow you to perform more complex logic later on)
    • The reason for creating these claim types and resource properties is so that they are selectable on any of your File Servers with the FSRM role installed automatically
    • In order to push them out, go to Resource Property Lists, edit the Global Resource Property List and add the resource properties you created
    • Next Select Central Access Rules and create a new rule. Under Target Resources, assign the resource property you created. This will mean this rule will apply to any objects that have this classification configured
    • Under Current Permissions, press Edit and apply permissions using Conditions similar to what you see below. Note for the Principal, use Authenticated Users. That means this will apply to everyone for the restrictions
      • It’s obvious this can get insanely granular and therefore it’s up to us as administrators to exercise significant restraint at every opportunity. Just because you can, doesn’t mean you should

Continue reading

Ipv6 Cheat Sheet

I found this cheat sheet for ipv6. It is very handy as it includes a column for ipv4 equivalents.

http://www.ripe.net/lir-services/new-lir/ipv6_reference_card.pdf

Through this I was able to confirm that:

FF00:: is for multicast addresses and is similar to 224.0.0.0
2001:: is for Teredo (allows ipv6 to tunnel through ipv4 NATs)
FC00: and FD00: are called Unique Local Addresses or ULAS and are similar to private IPs in IP4 (ala 192.168/172.16/10.0.0)
FE80: are Link Local Addresses and are similar to the APIPA address (169.254)


HOWTO: Clean up vRanger savepoints with Powershell

The scripts below I came up with as a way of identifying old or orphaned savepoints within vRanger 6.1.  Be careful with the remove command though as in its current form will also delete any differentials.  That’s probably what you’re looking for but if you have weird orphans, it might cause you some issues.  Pay close attention to what the reporting script says it’s going to delete.

#DELETE ALL VRANGER SAVE POINTS OLDER THAN 10 DAYS

# FIRST YOU NEED TO GET THE REPOSITORY ID FOR EACH REPOSITORY YOU WANT TO CHECK
Get-Repository | ft name, id

# TO SEE WHAT YOU'RE GOING TO DELETE, RUN THE FOLLOWING
get-repository -id [repositoryidfoundabove] | Get-RepositorySavepoint | Where-Object {$_.StartTime -le [datetime]::Today.AddDays(-10)} | select VMPath, EndTime, SizeInmbStored, SpaceSavingTechTypeID | convertto-csv -NoTypeInformation | clip.exe

# THE SCRIPT BELOW WILL REMOVE ALL SAVEPOINTS OLD THAN 10 DAYS 
# *IMPORTANT* THIS WILL DELETE BOTH FULL AND DIFFERENTIAL SAVEPOINTS
$savepoints = get-repository -id [repositoryidfoundabove] | Get-RepositorySavepoint | Where-Object {$_.StartTime -le [datetime]::Today.AddDays(-10)
foreach ($savepoint in $savepoints){
remove-savepoint -SavePointsToRemove $savepoint
}


HOWTO: Configure Citrix Netscaler to Perform Website Aware Load Balancing

This HOWTO describes the process of configuring a Citrix Netscaler to monitor for a keyword on a load balanced website and if that key word is not found (ie the node has failed), remove it.  Once removed, continue scanning and once the node is back up, read it.

  • The foundational technology we use here is called a “Monitor” which in Citrix parlance is a entity that can be used to repeatedly check some condition against some service
  • While you can configure monitors from the GUI, it turns out the GUI adds some random carriage returns that breaks the entire process so you have to do it from the CLI
  • So first you want to putty into the Netscaler.  Once logged in, you can type “shell” to access the full linux command line.  In our case, we don’t want to do that as we are running Netscaler specific commands
  • Create a new monitor using the command:


add lb monitor [monitorname] TCP-ECV -send “GET / HTTP/1.1\r\nHost:[hostheadername]\r\nConnection:Close\r\n\r\n” -recv [Keywordtosearchfor] -LRTM ENABLED

  • What this command does is:
    • creates a monitor called monitorname and makes it based on the built in template “TCP-ECV”.  The arguments provided to the –send parameter tell it what to send to the IP address you’ll configure later.  (You can probably configure it on the same line but I don’t know how to do that yet).
    • The GET / says get the root page.  So in this case, hostheadername doesn’t have an index.html or anything on the end so we can simply request the root page.
    • Because we are using host headers, we have to provide the host we are looking to connect to.  (This was the hardest part to figure out).  You’ll note the line remarks for \r and \n.  Those are critical as they must follow the HTTP standard.
    • The “connection close” close the connection after you obtained the information you needed so you don’t leave it hanging open.
    • Keywordtosearchfor is the string we’re looking for in the results to determine if the page is serving the content you expect or not.
    • The LRTM stands for “Least Response Time using Monitoring”.  I don’t know what it does but it seems like I need it.

    Continue reading

HOWTO: Resolve “login failure” issue for Service Account after Restart

Hi,


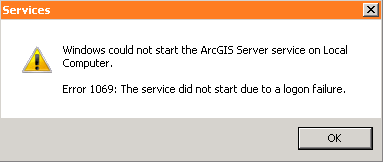
Have you ever had a situation where you have a service account configured on a Windows box and everything works great… until you reboot the server? After the reboot though, the service doesn’t start. When you open the services MMC, you discover that the status is in fact shown as not started.

So you right click and try to start it. But that doesn’t work. You get a “service did not start due to login failure error.” That’s odd.

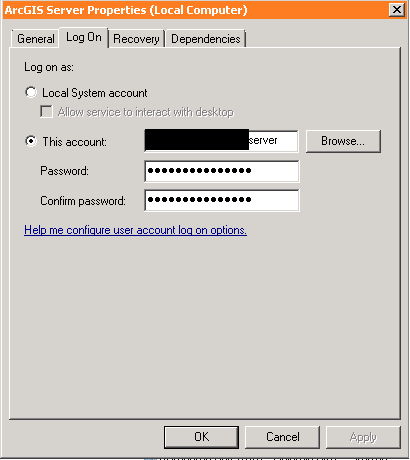
So you open the properties of the service, retype in the password and voila! It works…

… until you reboot again at which point you repeat the entire process over again. What’s going on here?

It turns out that if you defined any settings “Log on as a service” right in a GPO (most likely the Default Domain Policy), that policy will trump any local server settings (just as GPOs are supposed to).

So to ensure that the server will “remember” the password across reboots, you need to do the following:

  • On a domain controller, open the Group Policy Management Console
  • Open the policy where you configured the “login and as service” right (again, most commonly this is done in the Default Domain Policy)
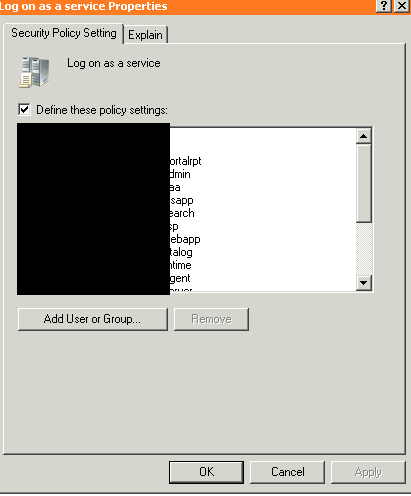
  • Browse the tree to Computer Configuration -> Windows Settings -> Security Settings -> Local Policies/User Rights Assignment -> Log on as a service
  • Edit the Log on as a service setting


  • If you are experiencing the problem described in this HOWTO, the “Define these policy settings” will be enabled and you will have domain accounts specified in the list. These are the ONLY accounts that are allowed to login as a service in your domain. You should further find that the domain account specified in the service in question is not listed here. You’ll need to add it.
  • Once you’ve done this, refresh your group policy on the server in question. You can run rsop.msc (Resultant Set of Policy) on the server to validate that the new account is present
  • That should be it. Now when you reboot the server, the service will start normally on next boot!