Are you interested in Office 365 and ADFS but are intimidated by it and not sure where to begin? If that’s the case, you’ve come to the right place. I have been studying to write my 70-346 (Managing Office 365 Identities Exam) and realized that I was still really weak on ADFS and how all the pieces work together. I decided I wanted to build a fully fleshed out ADFS environment in my own lab complete with a new Office 365 tenant and ADFS configured in high availability with the recommended 4 servers (redundant federation and redundant proxy servers). So that’s what I did and I’m going to walk you through the entire setup, starting from the very beginning.
Contents [hide]
Prerequisites
All the links download are free for testing purposes. To follow along with this HOWTO you will need:
Credit where credit is due. This HOWTO is based on basic ADFS deployment documentation found here: :
http://nolabnoparty.com/en/adfs-3-0-setup-upn-suffix-for-office-365-sso-pt-1/
Server Overview
I will be configuring this lab using VMware Workstation 12.5. You can however optionally use Hyper-V or VMware Player depending on your preferences. You can begin by deploying the following servers, ensuring they are fully patched and assigning IP addresses. You can then create a domain. I used vanlab.local. The server details I will use are shown for reference:
Note: Do NOT join LAB1-ADFS01 and LAB1-ADFS02 to the domain as for improved security these proxy servers are designed to not be joined to your production domain
Below is a very simple diagram of how the servers are laid out:
Note: Setting up the PFSense Firewall for this purpose will depend on your network environment. For me however it was largely next, next finish. The only change I made from defaults was I enabled a DHCP server with a range of 10.0.0.70-10.0.0.80.
Once you have all of the servers above deployed and a domain created, create a new administrator account. I used vanlab\admin-rv. Give this account Enterprise Admins and Schema Admins right as this will be required for a future step. We now have our framework in place. Let’s begin!
Create Office 365 Tenant
The first thing we need to do is create a new trial Office 365 account so we have something to connect our environment to do so. For our purposes we will use the name vanlab346.onmicrosoft.com. You can create a trial here:
https://products.office.com/en-us/business/office-365-for-business-free-trial
- You will be asked for some basic details.
- You will then be asked for your primary account. I recommend admin and whatever name is appropriate and available.
- You will be asked to provide a phone number to receive a text or phone call to verify you are human
- That’s it. Congratulations, you have an Office 365 test tenant you can use to configure ADFS
Add Your Domain to Office 365
- Log into the Office 365 Portal at https://portal.office.com using the admin@vanlab346.onmicrosoft.com you created above
- Click on Settings / Domain and choose Add Domain
- Enter your domain name when prompted. I used vanlab.net
- You now must verify you own the domain by creating a TXT record in the DNS for the domain as shown
- My DNS is hosted through NameCheap so I created the record there
- While you’re in the DNS control panel, add an A record called “fs.vanlab.net” that points to the public IP address where your infrastructure is hosted
- Wait a few minutes for DNS replication and then press Verify
- As I manage my own DNS record, I chose that option
- You now must create the remaining DNS records that are required for proper functionality of Office 365. I highlighted the most important but really you should take the time to create all of the records otherwise the wizard will complain
Create UPN Suffix for Production Domain
- The UPN for any users synced with Office 365 must match the domain with which you registered them. To do that open Domains and Trusts, right click on the root of the node and choose Properties. Add the domain you use in this case vanlab.net
Create User and Service Accounts
- You will need an end user account to verify your ADFS functionality. Create an root OU called Vanlab and under that create two more OUs called Users and Service Accounts. In the Users account, create a regular account called vanlab\jsmith. Be sure to set the UPN suffix to @vanlab.net
- In the Service Accounts OU, create an account called vanlab\svcadfs. It doesn’t need any special rights and will be used to run the ADFS services
- Still in the Service Accounts OU, create another account called vanlab\svcdirsync and grant him Domain Admin membership permissions. This account will be responsible for all Active Directory synchronization tasks
Install ADFS On Primary Node
- You are now ready to begin the installation of ADFS 3.0 that comes built into Windows 2012 R2. From Server Manager, select the Active Directory Federation Services role and next next finish through the remaining steps
- Once complete, select Configure the federation service on this server from the top right corner of Server Manager
- Choose Create the first Federation Server in a federation server farm
- Use the credentials of the signed in user
- Import the SSL certificate and set the federation service name to fs.vanlab.net and the display name to the domain name
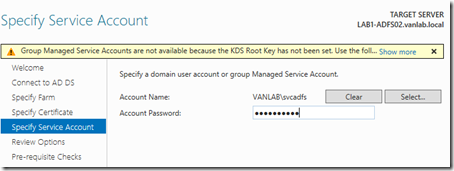
- Enter the credentials for the vanlab\svcadfs user to created above. We will not use group managed service accounts so you can ignore the warning
- Select Create a database on this server using Windows Internal Database. As a rule you generally only need a SQL Server if you have more 5 or more ADFS servers in your environment
Configure Internal DNS
- You need to ensure that the external name fs.vanlab.net resolves to your internal ADFS server. To do this without interfering with resolving other records in your domain, create a separate zone for fs.vanlab.net as shown below and assign the IP address of LAB1-ADFS01 to it
Configure Internet Explorer Intranet Zone
In order for Internet Explorer or indeed other browsers to be able to pass the logged in user credentials to your ADFS server, you need to ensure it is part of your Intranet Zone. You can do this using a group policy. I applied mine to my Default Domain Policy. Look in User Configuration / Policies / Administrative Templates / Windows Components / Internet Explorer / Internet Control Panel / Security Page. Edit the Site to Zone Assignment List, enable the feature and set the name to https://fs.vanlab.net with a value of 1 (Intranet Zone)
- Once group policy refreshes on your client machine, your ADFS server should now show the URL in the Intranet Zone
Test ADFS Functionality
- At this point ADFS should now be working internally for Active Directory accounts. To test it, connect to LAB1-CLIENT01 and browse to the following URL:
https://fs.vanlab.net/adfs/ls/IdpInitiatedSignon.aspx
- You should see the webpage below. Click Sign in
-
Enter the credentials of a valid Active Directory user account
- If everything is configured correctly you should see the message You are signed in.
Setup Web Application Proxy
- Next we want to configure our Web Application Proxy server. Log into LAB1-ADFSWAP01. Remember it should not be joined to the domain
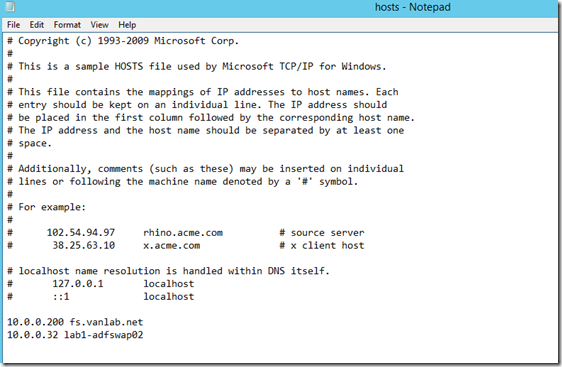
- Open the hosts file in c:\windows\system32\drivers\etc and add the highlighted lines shown. We do this because the servers are not joined to the domain and thus don’t have access to the internal DNS server. The second entry is for enabling HA in a future step
- – In Server Manager, add the Server Role Remote Access
- Select the Web Application Proxy service
-
Once the installation is completed, you’ll need to add your SSL certificate. Open Certificate Manager and add your certificate to the Local Computer
-
In Server Manager click on Open the Web Application Proxy Wizard
-
Enter the information as shown
-
Select the certificate when prompted
-
Once the wizard completes, click Publish in the top right corner
- Select Pass-through
- Enter the information as shown
Create Firewall Rules
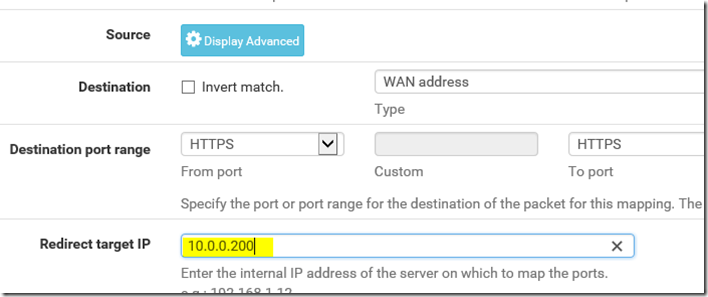
- Log into your PFSense Firewall and create a NAT rule that will take any traffic from your WAN interface on port 443 and direct it to your ADFS server as shown
- If it doesn’t create automatically, create a matching firewall rule that allows the traffic on port 443 to go to the ADFS server.
- Note: We will update these IPs again once we implement HA but will use the standalone IPs for initial testing
From a computer on the public Internet independent from your environment try connecting to
https://fs.vanlab.net/adfs/ls/IdpInitiatedSignon.aspx using the same steps as above. If it works, then congratulations your ADFS is working properly.
Prepare Office 365 for ADFS Integration
- On LAB1-ADFS01 download and install the Online Services Sign-In Assistant from here: https://www.microsoft.com/en-us/download/details.aspx?id=41950
- Download and install the Azure AD PowerShell module from here: http://go.microsoft.com/fwlink/p/?linkid=236297
- Open a PowerShell prompt as administrator and type Connect-MSOLService
- Login using your admin@vanlab346.onmicrosoft.com credentials
- Type Get-MSOLDomain to verify vanlab.net is present
- Type Convert-MSOLDomainToFederated –Domainname vanlab.net to enable ADFS
- Type Get-MSOLDomain again to verify the authentication type is now set to Federated
Configure Azure AD Directory Synchronization
- Log into DMS1-DIRSYNC01 and install Google Chrome (ironically the Office 365 portal does not load correctly for me in IE11)
- Log into the Office 365 portal using your admin account (https://portal.office.com)
- Select Settings / Services & Addons in the left hand pane
- Click on Directory Synchronization
- You will now be taken through to a wizard. Select Continue here at the bottom of the screen
- You will receive a pop up to check your directory. This will attempt to download an executable. You may have to allow pop-ups
- Select Run Checks
- A security warning will appear. Select Run
- Assuming no issues are identified press Next
- As we have already set up our domain, the domain validation step should go smoothly
- In a real production environment, you may need to clean up UPNs and other issues in bulk. Microsoft has a tool called idfix that can assist with this. As we are in a fresh lab environment, we can skip this. Press Next
- Select Download to get the Azure Active Directory Connect installer and run it
- Press Continue
- Unless you have a good reason not to, (ie multiple forests), you want to complete an Express Installation. Not only are the remaining steps automated but the Azure AD connect executables will automatically update themselves going forward
- Enter your Office 365 Credentials
- Enter the credentials for the vanlab\svcdirsync account you created earlier
- You domain should already be configured so no steps will be necessary here
- If the installation went smoothly you should see the screen below
Verify Azure AD Sync Tool is Working
- To verify that your ADSync tool can connect to Office 365, open a PowerShell prompt as administrator and type Get-ADSyncSyncCycle. If it connects successfully you should see Success
- There is a GUI based tool you can use to monitor synchronization details. To access it, open Local Groups on LAB1-DIRSYNC01 and create a new group called MIISdmins (yes that spelling is correct) and add VANLAB\Domain Admins
- Run c:\Program Files\Microsoft Azure AD Sync\UIShell\miisclient.exe
- You should be able to see the synchronization details and the resulting status
- Log into the Office 365 portal and select Users / Active Users, you should now see your John Smith User. Note that he is unlicensed
- Click on his name and under licenses assign him an Office 365 Business Premium License
- Log into LAB1-CLIENT01 as VANLAB\jsmith. Open a web browser and connect to https://portal.office.com. Login as jsmith@vanlab.net. As soon as you hit tab you should see a redirect take place:
- No password should be requested and you should now be logged into the portal as John Smith. Congratulations, your Office 365 worked
Install Office 2016
Important Note
It turns out that until March of 2016, Outlook did not support Single Sign on via ADFS. As of March of 2016, new updates have been released for Outlook 2013 and Outlook 2016 to enable “Modern Authentication” on these platforms (aka ADFS support). Older Outlook installations are not and will never be supported. Modern Authentication is also disabled by default in Office 365 so we need to enable it.
- Log into LAB1-CLIENT01 and then into https://portal.office.com as jsmith@vanlab.net.
- In order to test the end user experience, we will install Office 2016 by selecting it from the top right corner
- Wait about 15 or 20 minutes for Office to download and install (depending on your Internet connection speed of course)
Configure Autodiscover Lookups
As of this writing, the only supported way of editing Office 365 email accounts (for example to add an alias email address) is to use the Microsoft Exchange Admin Center or Shell. This means that you currently must still install an Exchange server in your environment even if you are hosting 100% of your mailboxes in the cloud. If you have DirSync or ADFS in your environment, Exchange is required to make changes. The problem is, once we introduce an Exchange Server, Outlook will try to connect to it and cause all sorts of problems. In order to prevent this, we need to tell Outlook to ignore the on-prem Exchange server. To do that, we need to install the Office 2016 ADM Policies from here:
https://www.microsoft.com/en-us/download/details.aspx?id=49030
- Login to LAB1-DC01 and extract the files in that download into a temporary directory such as c:\o2016gpo
- We must now configure a Group Policy Central Store. On your domain controller browse to c:\sysvol\sysvol\vanlab.local\Policies
- Create a folder called PolicyDefinitions
- Copy all of the files in c:\Windows\PolicyDefinitions into this new folder
- Next, copy the contents of c:\o365gpo into the new PolicyDefinitions folder
- Edit your Default Domain Policy and under User Configuration / Administrative Templates you should see “Policy definitions (ADMX files) retrieved from the central store”
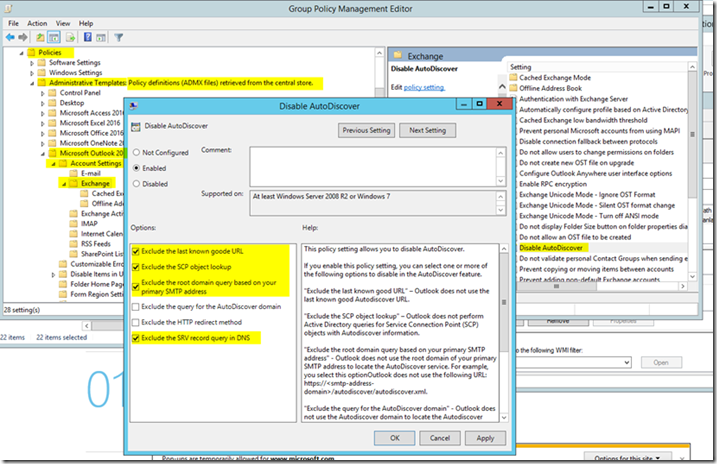
- Browse to Microsoft Outlook 2016 / Account Settings / Exchange and edit the option for Disable AutoDiscover
- Check the boxes to exclude every access method except for query for the AutoDiscoverDomain and HTTP Redirect as shown below
Enable Modern Authentication
- On your LAB1-ADFS01 box where you installed the PowerShell tools, open PowerShell and run the following commands to connect to your Office 365 session. Be sure to update the credentials accordingly:
$username = “admin@vanlab346.onmicrosoft.com”
$password = “PASSWORD” | ConvertTo-SecureString -asPlainText -Force
$Cred = New-Object System.Management.Automation.PSCredential($username,$password)
$Session = New-PSSession -ConfigurationName Microsoft.Exchange -ConnectionUri https://outlook.office365.com/powershell-liveid/ -Credential $Cred -Authentication Basic -AllowRedirection
Import-PSSession $Session
- Type Set-OrganizationConfig –OAuth2ClientProfileEnabled:$True
That’s it. Modern Authentication is now enabled. More details are available here:
Install Exchange 2016
As mentioned above, we need an Exchange 2016 server to provide for a supported means of editing Exchange attributes.
- Login to LAB1-EXCH01, open a PowerShell prompt as an administrator and paste in the following to install the prerequisites
Install-WindowsFeature AS-HTTP-Activation, Desktop-Experience, NET-Framework-45-Features, RPC-over-HTTP-proxy, `
RSAT-Clustering, RSAT-Clustering-CmdInterface, RSAT-Clustering-Mgmt, RSAT-Clustering-PowerShell, Web-Mgmt-Console, `
WAS-Process-Model, Web-Asp-Net45, Web-Basic-Auth, Web-Client-Auth, Web-Digest-Auth, Web-Dir-Browsing, Web-Dyn-Compression, `
Web-Http-Errors, Web-Http-Logging, Web-Http-Redirect, Web-Http-Tracing, Web-ISAPI-Ext, Web-ISAPI-Filter, Web-Lgcy-Mgmt-Console, `
Web-Metabase, Web-Mgmt-Console, Web-Mgmt-Service, Web-Net-Ext45, Web-Request-Monitor, Web-Server, Web-Stat-Compression, Web-Static-Content, Web-Windows-Auth, Web-WMI, Windows-Identity-Foundation, RSAT-ADDS
- Reboot once completed
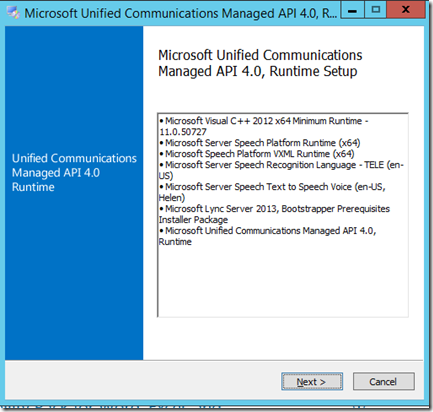
- You now need to install the Unified Communications Managed API available here (http://www.microsoft.com/en-us/download/details.aspx?id=34992)
- Extract the Exchange 2016 files (available here: https://www.microsoft.com/en-us/download/details.aspx?id=49161)
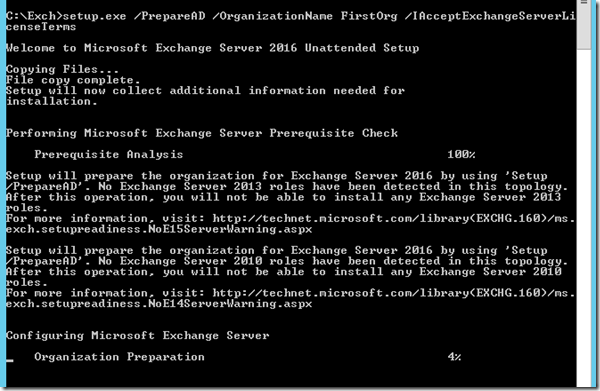
- You need to extend the AD schema to support the AD attributes. To do that type setup.exe /PrepareAD /Organizationname FirstOrg /IAcceptExchangeServerLicenseTerms
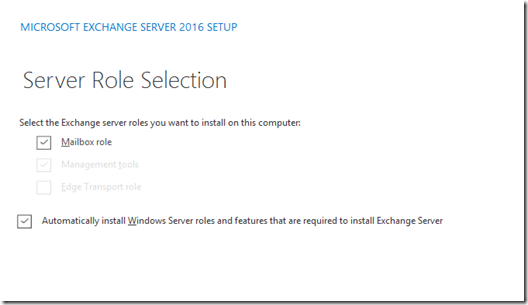
- Run setup.exe and select the Mailbox Role which auto installs the management tools.
- Note: If you only install the management tools, you won’t get access to the Exchange Admin Center and the Shell doesn’t work properly
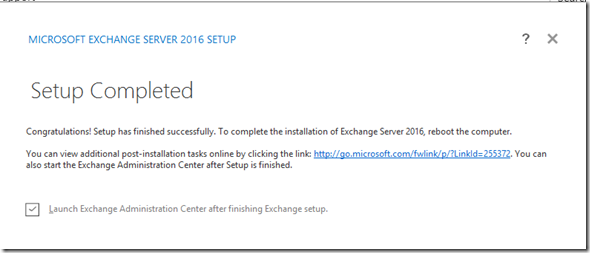
- Once the installation is completed, reboot
- Launch the Exchange Management Shell. If you get the error similar to the one below, it’s likely because you have PowerShell 5 installed and unfortunately at this time PowerShell 5 is not supported by Exchange 2016
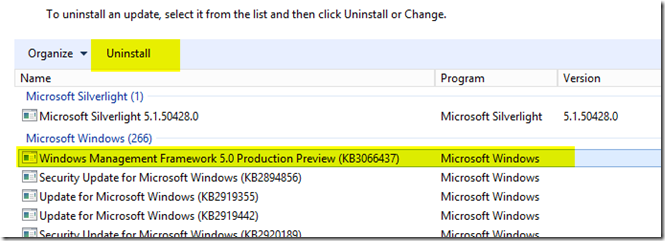
- To fix this, uninstall the Windows Management Famework 5.0
Update Users Email Address
Now that you have your AD user accounts, Exchange attributes in the schema, the users synced with Office 365 and your domain configured, you now need to set the primary SMTP address for your account to match your domain. Launch the Exchange Management Shell and type
Enable-MailUser -Identity jsmith -Alias jsmith -ExternalEmailAddress jsmith@vanlab.net
- On LAB1-DIRSYNC01, run Start-ADSyncSyncCycle again to move the changes over to Office365
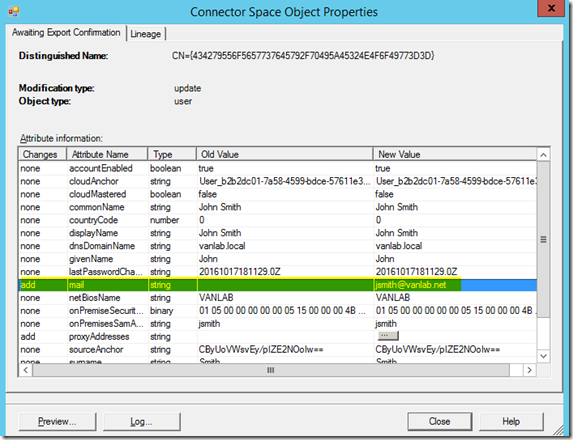
- If you launch the MIISClient.exe shown above, you will see the synchronization take place, specifically that the mail attribute was added for the users email address
- Log into the portal as an administrator and go into the Exchange Admin Console. Select Recipients and you should see that the email address for John Smith is now jsmith@vanlab.net
Configure Outlook 2016
-
On LAB1-CLIENT01 as vanlab\jsmith, launch Outlook 2016
-
The wizard should launch with your email auto-populated
-
It should use the autodiscover records to configure automatically
-
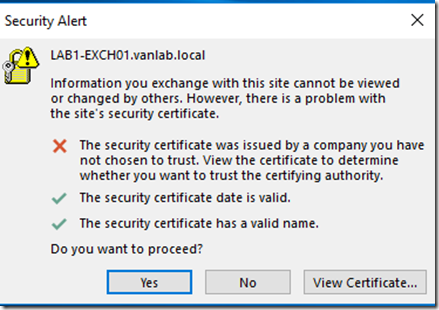
You will likely see an error about it still trying to connect to your onprem Exchange server. It turns out that the Group Policy changes we made above were not quite sufficient
-
Log back into LAB1-EXCH01 and open the Exchange Shell. Type
Set-ClientAccessService LAB1-EXCH01 -AutoDiscoverServiceInternalUri $NULL
At this point your ADFS implementation should be complete and your Outlook users can now launch Outlook without ever needing a password and can connect to the portal without ever needing a password.
Configure Network Load Balancing
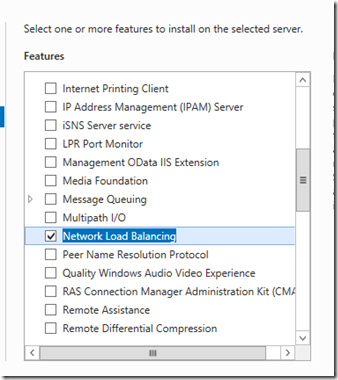
- On LAB1-ADFS01, LAB1-ADFS02, LAB1-ADFSWAP01 and LAB1-ADSAWAP02, install the the Network Load Balancing Feature
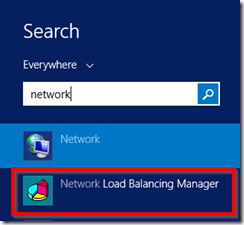
- On the primary nodes of each set of servers, launch the Network Load Balancing Manager
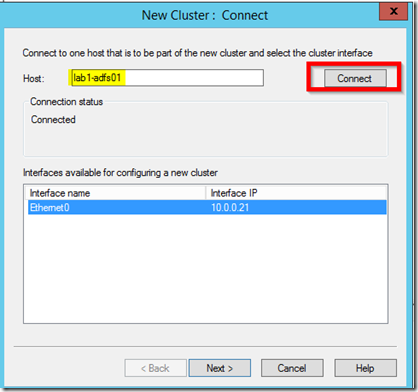
- Right click on the root node and choose New Cluster
- Add your primary node (ie lab-1adfs01 or lab1-adfswap01 depending on which set you are configuring)
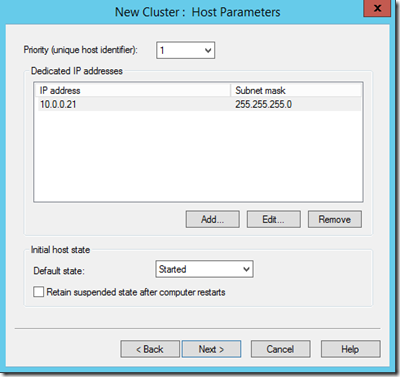
- For the primary node, the priority should be set to 1. For the secondary, it should be set to 2
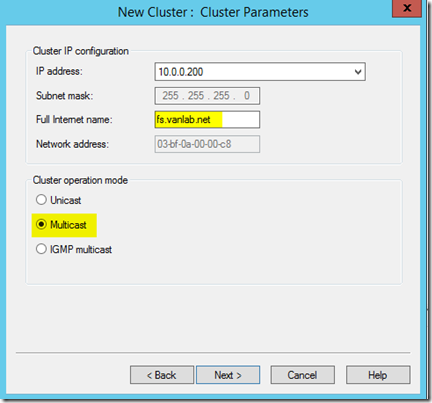
- Add the cluster IP. For ADFS use 10.0.0.200 and for ADFSWAP use 10.0.0.201
- Set the full internet name to fs.vanlab.net and set the cluster mode to Multicast
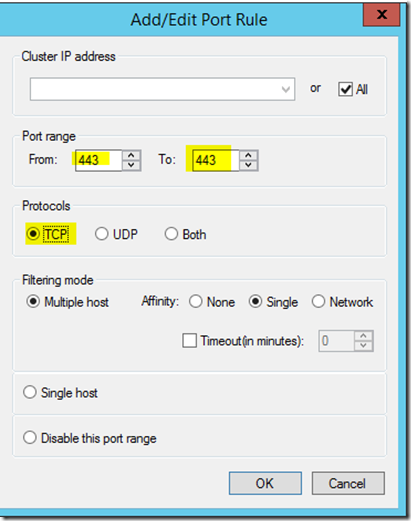
- Configure port TCP 443
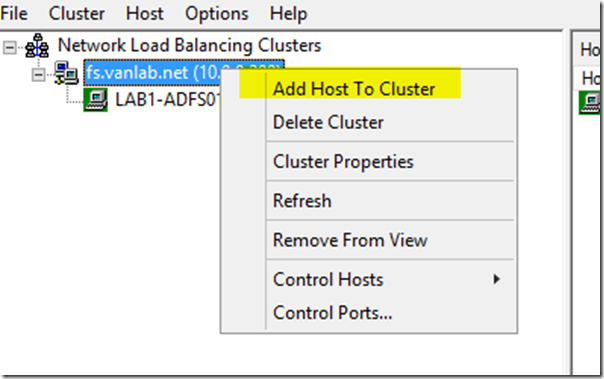
- Add the second node to the cluster in each environment and next next finish as the configs should match
- Eventually you should see both adapters and they should have a status of Converged
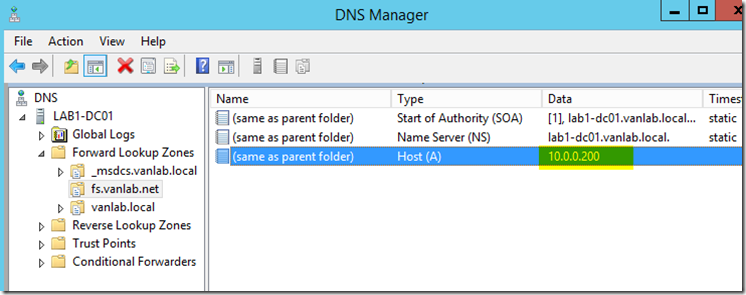
- Go back to DNS and change your IP for fs.vanlab.net from LAB1-ADFS01 (10.0.0.21) to your cluster IP of 10.0.0.200
- On each of your WAP servers, edit the hosts file and update the entry for fs.vanlab.net to point to 10.0.0.200
- On your Firewall, update the entry for 443 to send traffic to your cluster IP instead of your primary node
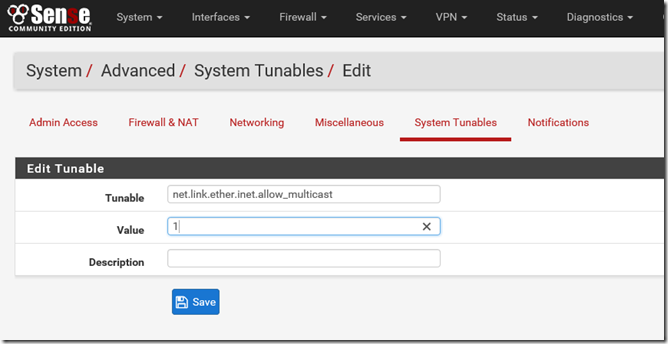
- If you are using PFSense, you will likely find you cannot connect to your ADFS environment externally once you have enabled clustering. This is due to how the multicasting and MAC address handling works. To resolve this issue, log into your PFSense firewall and choose System / Advanced / System Tunables / Add
Enter net.link.ether.inet.allow_multicast with a value of 1
Add Second Node to ADFS Cluster
- Using certificate manger, import your SSL certificate into the Personal store, just as you’ve done above
- From Server Manager install the Federation Services role just as before and choose Configure at that end of the installation
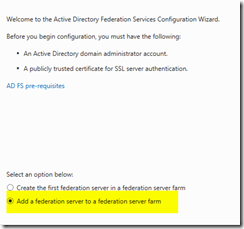
- Select Add a federation server to a federation server farm
- Type in the name of your primary server
-
Provide your vanlab\svcadfs credentials again
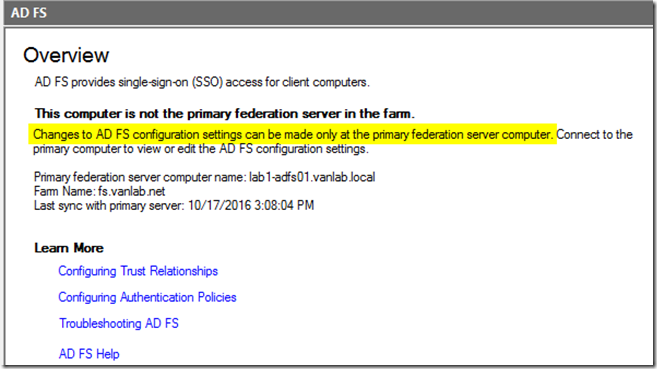
- Note: If you try to launch the ADFS Management console from the second node, you’ll see the following message
Add Second Node to ADFS Web Application Proxy
- Complete the exact same steps as above (Server Manager / Remote Access / Web Application Proxy / Run Wizard). Eventually you’ll see this screen:
Congratulations! You made it to the end! You should now have a highly redundant ADFS implementation that allows for Single Sign On to all Office 365 services!













1 comments
Hi,
Very good blog thank you for taking the time to do this. I think there is an error in your processes though.
Note: Do NOT join LAB1-ADFS01 and LAB1-ADFS02 to the domain as for improved security these proxy servers are designed to not be joined to your production domain
Should this not be…
Note: Do NOT join LAB1-ADFSWAP01 and LAB1-ADFSWAP02 to the domain as for improved security these proxy servers are designed to not be joined to your production domain
Thanks.