
I have been playing around with Dynamic Access Control in Windows Server 2012 for a few hours now and finally got it doing something useful. I wanted to document in broad terms what steps were needed to configure DAC:
-
Edit your default Domain Controllers policy and enable support for Claims
- Claims are essentially the ability to perform authentication look ups based on any attribute stored in Active Directory
-
Computer Configuration / Policies / Administrative Templates / System / KDC / KDC support for claims, compound authentication and Kerberos armoring = Enabled
- Claims are essentially the ability to perform authentication look ups based on any attribute stored in Active Directory
-
Open up the Active Directory Administrative Center and go to Dynamic Access Control section
- Select Claims Type
-
Create a new claim type for the AD attribute you want to authenticate with (ie Job title)
- Select the AD attribute from the existing list, give it a friendly name and set the Suggested Values to what you’re going to look up
-
Select Resource Properties next and go to New / Reference Resource Property
- Choose the claim type you created before and assign it either a multi-value choice (This will allow you to perform more complex logic later on)
- The reason for creating these claim types and resource properties is so that they are selectable on any of your File Servers with the FSRM role installed automatically
- In order to push them out, go to Resource Property Lists, edit the Global Resource Property List and add the resource properties you created
- Next Select Central Access Rules and create a new rule. Under Target Resources, assign the resource property you created. This will mean this rule will apply to any objects that have this classification configured
-
Under Current Permissions, press Edit and apply permissions using Conditions similar to what you see below. Note for the Principal, use Authenticated Users. That means this will apply to everyone for the restrictions
- It’s obvious this can get insanely granular and therefore it’s up to us as administrators to exercise significant restraint at every opportunity. Just because you can, doesn’t mean you should

- Select Claims Type
- Select Central Access Policy. This is the thing that you’ll apply on the actual file server
- Add in the rule you created above
-
Configure your file servers to know about these new policies or otherwise enable Dynamic Access Control on your file servers
- Make sure your File servers are in an OU that is subject to the Default Domain Policy. Edit your default Domain Policy
- Browse to Computer Configuration / Policies / Windows Settings / Security Settings / File System / Central Access Policy
- Right click and choose Manage Central Access Policies
- Add the CAP you created above
-
Configure your File Server to use Dynamic Access Control
- If you haven’t done so yet, you need to installed the File Server Resource Manager Role (FSRM). This is the code that knows how to look at the AD objects we created that make DAC function
- Create a new share and for our purposes (and possibly in production as well), set the Share permissions to Everyone, Full Control and NTFS permissions also to Everyone, Full Control (or if you prefer, Authenticated Users)
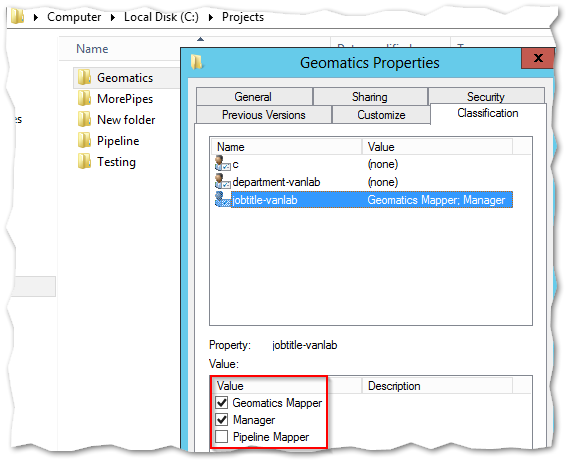
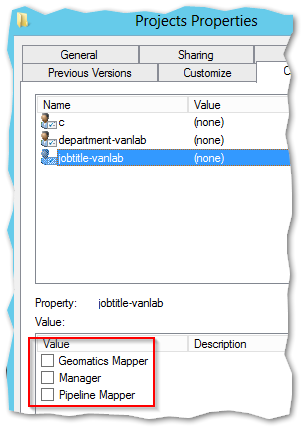
- Once its installed, a new tab will be available in the file system called Classification
-
By checking the classification properties, you can assign and restrict access to data based on these selections – But not yet, since nothing is enforced yet so there is still more to configure!
- If you haven’t done so yet, you need to installed the File Server Resource Manager Role (FSRM). This is the code that knows how to look at the AD objects we created that make DAC function
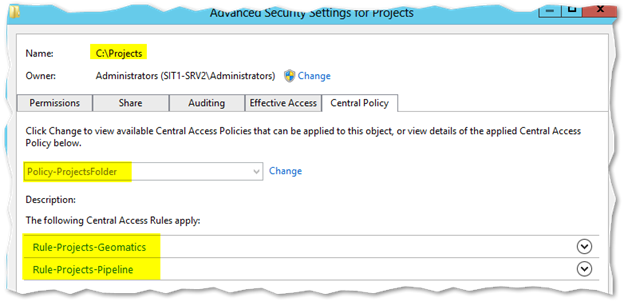
- Go to the security tab and select Advanced
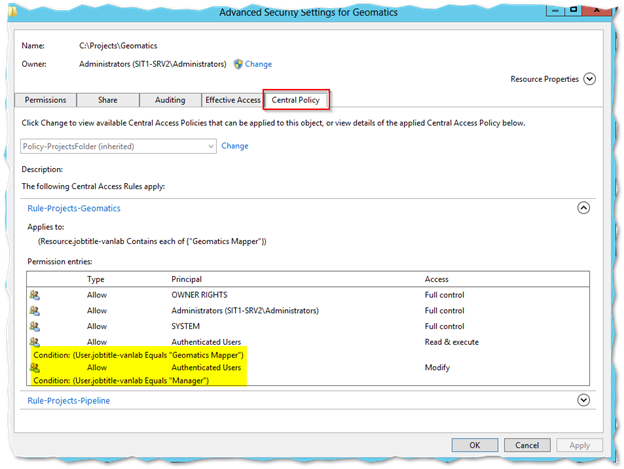
- Provided you configured your Central Access Policy correctly and exposed it through group policy, you should have a new tab called Central Policy
-
Apply the policy you configured. Once you do, you’ll be able to see the resulting configuration below
-
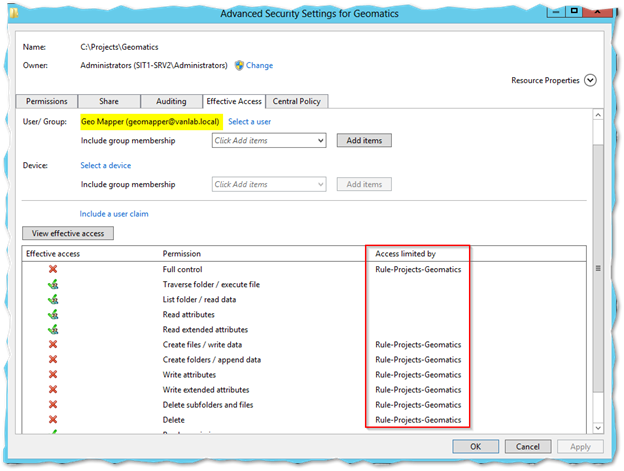
You can then use the Effective Access tab to confirm if the policy is working as desired
- The nice thing about this too is that if a restriction is found, it’ll tell you what caused it – this includes NTFS and share permissions too which is awesome
That about does it. In the example above, I was able to create a root projects folder and place specific department project folders inside it (in my case called “Pipeline” and “Geomatics”).
Then, based on the job title of the user, regular employees of one department could only read data in their own folder while anyone with Manager in their title was able to modify data in either folder.
The possibilities for this technology are practically limitless, and a little daunting. Especially because of the sheer number of touch points to possibly break things.
With that said, here a few tips that I learned along the way:
-
Microsoft understands the implications if you screw up on this so they included the concept of “proposed permissions” and promoting permissions.
- The idea is you can make all of your complex configurations and apply them as proposed. They won’t restrict anyone but will generate eventids in event viewer so you can track how they are working
- Once you’re done, it’s a single button to promote them all into production
-
I wasn’t able to determine what changes required refreshes, updates or reboots and what did not. From what I can tell though, any changes made on the File Server are immediate (just like NTFS).
- But this notably does not include configuring conditions. That must be done from ADAC. Which means the typical replication issues seem to apply
- If you add new file classification attributes in ADAC, they won’t show up on your File Server immediately. To pull them down, run the Powershell cmdlet Update-FsrmClassificationPropertyDefinition
- I configured my policies as follows:
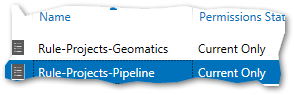
- One rule for each department
- Each rule was configured to allow the matching job title read only permissions with the manager title given modify permissions

- A single Client Access Policy was created that contained both rules

- The policy was applied at the root of the projects folder
- Notably the root does not specify any kind of classifications. When I did, the users were unable to open the root folder as the competing rule would deny them access (so many ways to build these things!)
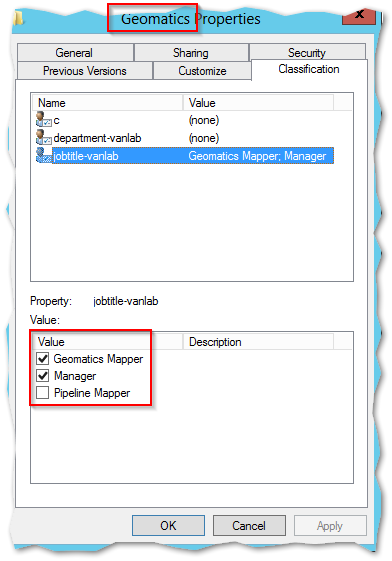
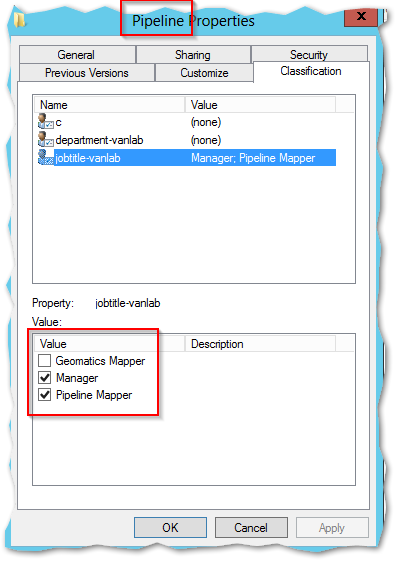
- The Geomatics Folder was set to allow Geomatics and Managers in while the Pipeline Folder was for Pipeline Users
When all is said and done, when I logged in as a Pipeline user, I could only access the Pipeline folder as read. The Geomatics user could only see their data as read while the manager could write to both.
Original Source Material: